Debian Startup_Scripts
Scripts can be found at :
- [[https://github.com/0xc0rvu5/Startup_Scripts]]
Below will be a technical overview of what the script does. Following this, I will explain in more detail what and why the script does what it does. Alright! Lets begin,
What it does:
1.sh
	- Updates system
	- Installs necessary packages
		- apt-transport-https curl wget git xclip mlocate vim-gtk3 terminator zsh fish \
		bat tldr

- Installs unecessary packages
	- toilet figlet cowsay fortune lolcat boxes

- Adds iptables ruleset and creates a copy at ../configs/iptables.sh

- Installs brave-browser
	- Adds files
		~ /usr/share/keyrings/brave-browser-archive-keyring.gpg
	 	~ /etc/apt/sources.list.d/brave-browser-release.list

- Installs VSCode
	- Adds files
		~ /usr/share/keyrings/packages.microsoft.gpg
		~ /etc/apt/source.list.d/vscode.list

- Installs additional packages
	- libpam-tmpdir apt-listchanges debsums apt-show-versions sysstat auditd chkrootkit \
	rkhunter unhide fail2ban unattended-upgrades acct arpwatch shellcheck vlc xpad tor \
	sqlite3 sqlitebrowser python3-pip python3-virtualenv iptables-persistent

- Activates unattended-upgrades
	- Creates a local file for /etc/apt/apt.conf.d/50unattended-upgrades here:
		~ /etc/apt/apt.conf.d/52unattended-upgrades-local
	- Copies ../config/02periodic to:
		~ /etc/apt/apt.conf.d/02periodic

- Starts services on reboot:
	- arpwatch auditd fail2ban sysstat unattended-upgrades

- Disables services on reboot:
	- cups cups-browsed ufw

- Starts services immediately:
	- auditd fail2ban sysstat unattended-upgrades

- Disables services immediately:
	- cups cups-browsed ufw

- Adds a single arpwatch interface to monitor and adds ruleset to:
	~ /etc/arpwatch/your_interface.iface

	- Starts service on reboot and immediately after creating file

- Adds auditctl ruleset to:
	~ /etc/audit/rules.d/audit.rules

- Adds banners to:
	~ /etc/motd
	~ /etc/issue
	~ /etc/issue.net

- Installs zsh/fish shell across all users
	- Based on choice:
		- For zsh installs:
			- oh-my-zsh
		- For fish installs:
			- oh-my-fish

2.sh
	- Installs rust
		- Installs rustscan
		- Installs feroxbuster

- Installs zsh/fish shell across all users
	- Based on choice:
		- For zsh installs:
			- oh-my-zsh
		- For fish installs:
			- oh-my-fish

3.sh
	- Updates `tldr` for root and any user(s) with the binary

- Creates directories at:
	~ /root/.local/bin
	~ /root/.local/share
	~ /root/.config/terminator
	~ /home/user/.local/bin
	~ /home/user/.config/terminator

- Creates files at:
	~ /root/.config/terminator/config
	~ /home/user/.config/terminator/config

- Creates syslinks for `batcat`:
	~ ln -s /usr/bin/batcat /root/.local/bin/bat
	~ ln -s /usr/bin/batcat /home/user/.local/bin/bat

	- If Distribution ID is `Debian`:
		~ ln -s /usr/bin/batcat /usr/local/bin/bat

- If the root and current user have a bash/zsh/fish shell then these paths will be appended to
utilize ~/.cargo/bin ~/.local/bin binaries:
	~ export PATH="$HOME/.local/bin:$PATH"
	~ export PATH="/home/user/.cargo/bin:$PATH"

- If the following files/directories are present in the root/user ~/ directories:
	~ ~/.bashrc
	~ ~/.oh-my-zsh
	~ ~/.config/fish

	- Create the relevant alias files for the user here:
		~ ~/.bash_aliases
		~ ~/.oh-my-zsh/custom/aliases.zsh
		~ ~/.config/fish/functions

Log file at:
	~ log

	- Color coated:
		- Blue:
			- Content of file configurations

		- Green:
			- Installed packages

		- Green Background:
			- Time stamps at the beginning and end of each script

		- Red:
			- System service changes

		- Yellow:
			- File configurations
1.sh
First off we’ll be updating the system. Generic Debian based system updates can be accomplished with:
sudo apt autoclean -y; sudo apt update -y; sudo apt upgrade -y; sudo apt autoremove -y
This will update the system and ensure all packages are up-to-date. Depending on whether you installed a fresh ISO image alongside the amount of resources you have allotted to your machine will differentiate the time this step will take. Generally, with more that 4GB of ram and enough CPU core processors this will take a minute or two tops. If you have 4GB or less expect it to take quite some time.
After upgrading the system, in order to ensure the script runs without any issues we are going to want to install the necessary packages required for the script:
apt-transport-https curl wget git xclip mlocate vim-gtk3 terminator zsh fish bat tldr
Let’s break these down one by one:
- apt-transport-https
- Allows apt, the debian package manager, to connect to repositories over HTTPS.
- curl
- A command line tool for transferring data from the internet.
- Curl has more functionality that wget.
- A command line tool for transferring data from the internet.
- wget
- A command line tool for downloading files from the internet.
- Though not used within the script itself, I find myself using wget quite often due to the simple syntax.
- A command line tool for downloading files from the internet.
- git
- A version control system for tracking changes in files.
- Used to clone repositories from github.
- Commonly used by many developers and especially for those who use github and it’s functionality daily.
- xclip
- A command line tool for copying and pasting text from the command line.
- mlocate
- A tool for finding files on the file system.
- vim-gtk3
- A version of the vim text editor with a GTK3 interface.
- terminator
- A terminal emulator with advanced features.
- zsh
- A shell with additional features and syntax.
- Used natively as the default shell on Mac and Kali Linux.
- fish
- A shell with additional features and syntax.
- bat
- A command line tool for viewing and manipulating file with syntax highlighting.
- Simliar to cat, but has the aforementioned syntax highlighting, line numbers and forward/back scrolling functionality with the
fandbkeys. - The simliar command that can be ran with
catandlesswhich excludes the syntax highlighting would be:cat -n my_file.txt | less-n- displays the line numbers|- the pipe transfers the cat output ofmy_file.txtto thelesscommandless- allows for forward/back scrolling functionality with thefandbkeys for paging up/down and also theupanddownarrows to move line by line
- tldr
- A tool for displaying simplified versions of man pages.
- “too long; didn’t read”
These are some of my favorite packages. If you also enjoy these packages now or later don’t hesistate to reach out to me and determine other packages that I enjoy using. I am more than happy to share.
Moving on, next order of business would be the unnecessary packages that are installed during this script. I named the function within the script this because they are just that, unnecessary, but they do add some flare to the script!
These packages will be listed below:
toilet figlet cowsay fortune lolcat boxes
These packages are strictly for aesthetics. These is nothing more uneventful than a script that has no ASCII art and text banners! Well, I suppose if works as expected then it doesn’t matter, but anyways moving on. These packages are all command line tools that can be used to create ASCII art and text banners.
Let’s also break these down one by one:
- toilet
- Can output text in various font styles and can display it in a variety of ways.
- figlet
- Generates large ASCII text banners based on the text supplied.
- cowsay
- Outputs a message in the form of a speech bubble from none other than a cow.
- lolcat
- Outputs text in rainbow colors.
- boxes
- A command line utility that can draw ASCII boxes and text banners.
- Don’t get it mixed up with
gnome-boxesas we aren’t creating any virtual environments here, but instead having some ASCII fun!
If someone really did not have the storage spaces for these packages then the function could easily be disabled by prepending a # prior to the function call within the updates function and this would ensure the unnecessary packages were not installed. This shouldn’t effect the script with the exception of some additional error messages and the lack of ASCII art and color within the script itself.
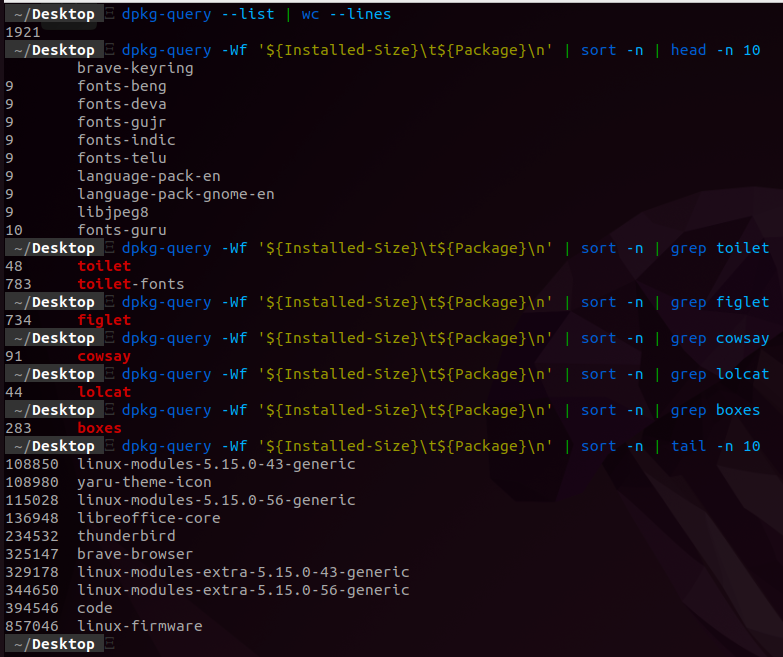
To put the package sizes into perspective I took a snapshot below of the following:
- The amount of packages installed on a fresh Ubuntu install (Post running the script)
dpkg-query --list | wc --linesordpkg-query -l | wc -l- Show me the number of all of the packages installed.
dpkg-query --list- This outputs the installed packages on a Debian system + or - 6 additional lines at the top of the command output|- the pipe transfers the output ofdpkg-query --listtowc --lineswc --lines- counts the number of lines within a file
dpkg-query -Wf '${Installed-Size}\t${Package}\n' | sort -n | head -n 10- Show me the first 10 packages installed by size starting from smallest to largest
dpkg-query -Wf- This outputs the installed packages on a Debian system by:-W---show [package-name-pattern...]-f---showformat=format
'${Installed-Size}\t${Package}\n'- The desired format to be output|- the pipe transfers the output to thesortcommandsort -n- sort by number|- the pipe transfers the following command to theheadcommandhead -n 10- this reads as, show me the first ten lines of the file
Keep in mind that if you are ever on a Linux system and want to utilize the power of both the man pages and grep without actually going into the file and typing /-f, for example, if you wanted to hone in on what -f flag was meant to do instead you can type:
man dpkg-query | grep -- -W
This will display in the terminal what the -W flag does.
Sometimes it may cut off a line or two of relevant information, if so run the following command to your desired needs:
man dpkg-query | grep -A 5 -B 5 -- -W
This time the output will display 5 lines above -A and 5 lines below -B the -W flag.
In the below photo we can see that there are roughly 1921 packages in a fresh Ubuntu 22.04 install. Furthermore, we see the smallest packages and the largest packages on the system. We also see where the previously mentions unnecessary packages fit on this spectrum. I wanted to illistrate that the packages really do not hog too much room on your filesystem, but nonetheless, I included a function that is presented on the main options menu which allows you to uninstall these packages with ease. If all else failed, you can reference the log file which has the packages listed together and a simple sudo apt remove --purge with the list of the unnecessary packages following would remove them.
Next up would be the installation of Brave and VSCode.
These are relatively straight-forward. I personally enjoy using Brave after using it explicitly when following Michael Taggart’s PWST (Practical Web Application Security and Testing) course on the TCM Security platform. If you are into that kind of stuff I highly recommend the course, 10/10, from someone with a general good understanding of web application testing after running through the 200 something modules on Portswigger.
VSCode is a wonderful tool if you are into coding/programming. It is my preferred tool of choice due the high level of granularity or the level of detail and control it provides over different aspects of the development process.
The script adds the following files post installation:
~ /usr/share/keyrings/brave-browser-archive-keyring.gpg
~ /etc/apt/sources.list.d/brave-browser-release.list
~ /usr/share/keyrings/packages.microsoft.gpg
~ /etc/apt/source.list.d/vscode.list
Once the following gpg keys are properly integrated into the system:
brave-browser-archive-keyring.gpgpackages.microsoft.gpg
Alongside the repositories:
brave-browser-release.listvscode.list
The packages will be included whenever your system is updated. If an update or security patch is passed along within the repository you will have it immediately versus, say, directly installed the code binary. I included the locations of where the files are located in the log file in case the full removal of either of the packages are required. If so, I recommend deleting each file as there will be no purpose to have the repository pulling updates if there is no package(s) to update.
The last set of packages installed within this script are contained within the additional_packages function. These packages include:
libpam-tmpdir apt-listchanges debsums apt-show-versions sysstat auditd chkrootkit rkhunter unhide fail2ban unattended-upgrades acct arpwatch shellcheck vlc xpad tor sqlite3 sqlitebrowser python3-pip python3-virtualenv iptables-persistent
If you want a description of a package and don’t want to use your GoogleFu skills you can always run:
apt show libpam-tmpdir
Though the list is lengthy compared to the other two let’s break them down:
- libpam-tmpdir
- automatic per-user temporary directories. Many programs use $TMPDIR for storing temporary files. Not all of them are good at securing the permissions of those files. libpam-tmpdir sets $TMPDIR and $TMP for PAM sessions and sets the permissions quite tight. This helps system security by having an extra layer of security, making such symlink attacks and other /tmp based attacks harder or impossible.
- apt-listchanges
- Shows a list of changes made by the package manager when installing or upgrading packages.
- debsums
- Checks installed files against their checksums to verify the integrity of packages.
- apt-show-versions
- Shows the version and status of installed packages.
- sysstat
- Collects and reports system performance information.
- auditd
- Audits system events and records them in a log file.
- chkrootkit
- Scans the system for signs of rootkits.
- rkhunter
- Scans the system for rootkits and other malware.
- unhide
- Scans the system for hidden processes and ports.
- This can be used as an extension to
rkhunter.
- fail2ban
- Blocks IP addresses that show malicious activity.
- unattended-upgrades
- Automatically installs security updates.
- acct
- Enables process accounting, which logs information about the commands run on the system.
- arpwatch
- Monitors the ARP activity on a network and sends alerts for suspicious activity.
- shellcheck
- Analyzes shell scripts and warns about potential issues.
- vlc
- A media player that can play a wide range of audio and video formats.
- For Ubuntu, if you want to remove
firefoxas a snap I recommend this package otherwise you may have issues watching videos.
- xpad
- A sticky note application.
- tor
- A network that provides anonymity for internet users.
- sqlite3
- A command line interface for SQLite databases.
- sqlitebrowser
- A graphical interface for SQLite databases.
- python3-pip
- A tool for installing Python packages.
- python3-virtualenv
- A tool for creating isolated Python environments
- iptables-persistent
- Saves iptables firewall rules so that they are preserved across reboots.
These are packages I find to be useful hence the reason I included them within the script. I will go into more detail on some of these packages within this blog post. I may create an additional post which goes into much more detail on the purposes and use cases of each individual package. The packages I will cover today within this blog post include unattended-upgrades, arpwatch, auditd, fail2ban, rkhunter and unhide.
Let’s get started!
unattended-upgrades
File #1 created for unattended-upgrades:
/etc/apt/apt.conf.d/52unattended-upgrades-local- This file is a direct copy of:
etc/apt/apt.conf.d/50unattended-upgrades
- The newly created file will act as a primary file which we can update and change while maintaining the integrity of the original file for backup purposes.
- The following content will be appended too
etc/apt/apt.conf.d/52unattended-upgrades-local:Unattended-Upgrade::Remove-New-Unused-Dependencies "true"; Unattended-Upgrade::Remove-Unused-Dependencies "true"; Unattended-Upgrade::AutoFixInterruptedDpkg "true";
File #2 will be located in the /configs directory:
/config/02periodic- This file will be copied to:
/etc/apt/apt.conf.d/02periodic
- The following content will be inside the
/etc/apt/apt.conf.d/02periodicfile:
// Control parameters for cron jobs by /etc/cron.daily/apt-compat //

// Enable the update/upgrade script (0=disable)
APT::Periodic::Enable "1";

// Do "apt-get update" automatically every n-days (0=disable)
APT::Periodic::Update-Package-Lists "1";

// Do "apt-get upgrade --download-only" every n-days (0=disable)
APT::Periodic::Download-Upgradeable-Packages "1";

// Run the "unattended-upgrade" security upgrade script
// every n-days (0=disabled)
// Requires the package "unattended-upgrades" and will write
// a log in /var/log/unattended-upgrades
APT::Periodic::Unattended-Upgrade "1";

// Do "apt-get autoclean" every n-days (0=disable)
APT::Periodic::AutocleanInterval "21";

// Send report mail to root
//     0:  no report             (or null string)
//     1:  progress report       (actually any string)
//     2:  + command outputs     (remove -qq, remove 2>/dev/null, add -d)
//     3:  + trace on
APT::Periodic::Verbose "2";
If for some reason the previous file mentioned is excluded then unattended-upgrades will not automatically start. If this is the case, where /etc/apt/apt.conf.d/52unattended-upgrades-local is present, but /etc/apt/apt.conf.d/02periodic is not then I recommend running the following command:
sudo dpkg-reconfigure -plow unattended-upgrades
This will output:
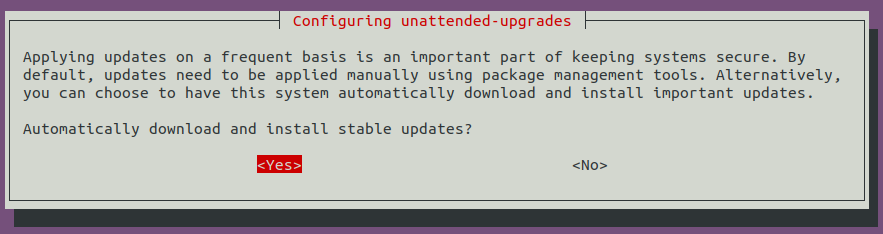
Within the script I included the non-interactive way of accomplishing this:
echo unattended-upgrades unattended-upgrades/enable_auto_updates boolean true | debconf-set-selections
dpkg-reconfigure -f noninteractive unattended-upgrades
The above code was added for safe-keeping. I say this because when we add /etc/apt/apt.conf.d/02periodic we automatically initiate unattended-upgrades with the exception of actually enabling the service on reboot. We will do that in the service section. I will attach a link that explains unatteded-upgrades in more detail if you are interested.
- [[https://wiki.debian.org/UnattendedUpgrades]]
Services
In order to use various packages installed we will need to ensure they are enabled on reboot. The following packages will be enabled on reboot within the script:
arpwatch auditd fail2ban sysstat unattended-upgrades
To enable the packages on reboot we will use the systemctl command. Here is an example:
sudo systemctl enable arpwatch
We will disable various services on reboot:
cups cups-browsed ufw
- cups and cups-browsed
- These are printer specific and I generally keep them turned off unless they are needed.
- ufw (Uncomplicated Firewall)
- This is firewall used on stock Ubuntu.
- I disable this and use
iptablesinstead. Here is an example of disabling a service on reboot:sudo systemctl disable cupsThe services that will be activated in the current session include:
arpwatch auditd fail2ban sysstat unattended-upgradesExample:
sudo systemctl start arpwatch
//or//
sudo service arpwatch start
- Keep in mind, if you are using a RedHat distribution
systemctlwill work, butservicewill not. These services will be disabled in the current session:cups cups-browsed ufwExample:
sudo systemctl stop cups
//or//
sudo service cups stop
Arpwatch
In order to monitor any changes to our IP or MAC address we will dynamically update the interface to watch. Here is the code to accomplish this:
conn=$(ip -4 -o a | cut -d ' ' -f 2,7 | cut -d '/' -f 1 | awk '{print $1}' | tail -1)
ip- is a command-line utility for working with network interfaces and IP addresses.-4- specifies that only IPv4 addresses should be displayed.-o- tellsipto print the addresses in a more parsable format, including the interface name.a- stands for “all”, so this tellsipto show all addresses on all interfaces.cut- is a command-line utility for extracting specific fields or columns from a file or input.-d- specifies the delimiter to use when splitting the input into fields. In this case, the delimiter is a space character (‘ ‘).-f- specifies which fields to include in the output. In this case, the fields are 2 and 7, which are the second and seventh fields after the input is split into fields using the space character as the delimiter.awk- is a command-line utility for processing text files. It can perform a wide range of operations on text, including searching, printing, and manipulating text.{print $1}- tellsawkto print the first field of each input line.
Here the command is step-by-step in visual form:
- Take note that since i have
ipas an alias and I am actively in afishshell in the screenshot I use thecommandfunction which in turn cancels out the alias. - Alternatively, if you are using
zshinstead of command you can use a\.\ip -4 -o a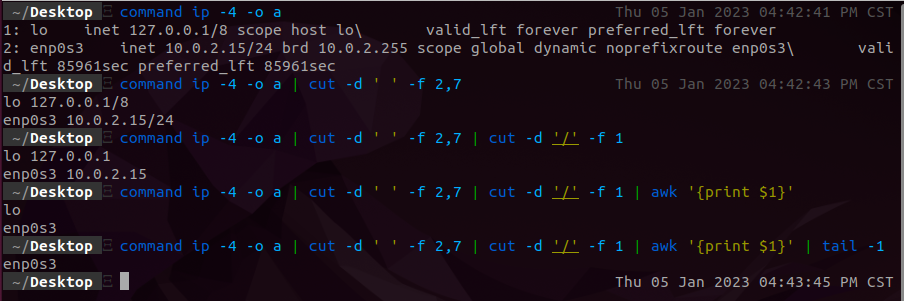
Now keep in mind this will grab all the current interfaces on your system and take the last interface. I did this to avoid the loop-back interface i.e. lo. If you have a vpn on it will take the VPN interface tun0 or whatever it may be so keep that in mind.
Alternatively, you can use the following code:
ip -br -c a | grep -i up | awk '{print $1}'
ip- is a command-line utility for working with network interfaces and IP addresses.-br- tellsipto output addresses in a compact format.-c- specifies that the output should be colorized.a- stands for “all”, so this tellsipto show all addresses on all interfaces.grep -i- tellsgrepto perform a case-insensitive search.awk- is a command-line utility for processing text files. It can perform a wide range of operations on text, including searching, printing, and manipulating text.{print $1}- tellsawkto print the first field of each input line.
Here the command is step-by-step in visual form:

Shout-out to Matt Kiely the creator of PMAT (Practical Malware Analysis & Triage) for TCM Security. If it wasn’t for following him on one of his videos (outside of the PMAT) then I wouldn’t have this lovely highlighted ip syntax to use.
For some strange reason when I used the above code it would include the interface, but what seemed to be ASCII colors that were merging with the interface name. Back to the focus, that being the added dynamic arpwatch interface.
A file will be added to:
/etc/arpwatch/your_interface.ifaceThe following content will be included within the file:INTERFACES="your_interface" ARGS="-N -p"
Following this file creation the service for your_interface will be enabled on reboot and the service will start immediately. Here is an example:
systemctl daemon-reload
systemctl enable arpwatch@enp0s3
systemctl start arpwatch@enp0s3
Verify the service is active:
ps aux | grep arp
Locate the relevant log files here:
/var/lib/arpwatch
In my example the log file will be located here:
/var/lib/arpwatch/enp0s3.dat
Here is a reference and a more in-depth guide:
- [[https://www.mybluelinux.com/arpwatch-monitor-mac-addresses-change/]]
Auditd
Persistent audit rules will be added to:
/etc/audit/rules.d/audit.rulesThese rules include:-w /etc/passwd -p rwxa -k passwd_access -w /etc/shadow -p rwxa -k shadow_access -w /etc/gshadow -p rwxa -k gshadow_access -w /etc/hosts -p wa -k hosts_file_change
Upon reboot these rules will be active within your auditctl list. You can verify with:
sudo auditctl -l
To investigate the audit logs for a certain file use ausearch:
sudo ausearch -i -k gshadow_access
ausearch- is a command-line utility for searching the audit logs for events that match specified criteria.-i- tellsausearchto interpret the following argument as a search term or pattern.-k- tellsausearchto interpret the following argument as a key, which is used to filter the search results by the key value.gshadow_access- would be thekeyor rule name being queried.
For a more comprehensive list of rules I recommend: [[https://www.daemon.be/maarten/auditd.html]]
Grub Password Related
A simple backup is created for the following file:
/etc/grub.d/40_customThe backup is placed here:/etc/grub.d/40_custom_backup
The sole purpose of this backup is in the off-chance you decide to put a password on your grub boot-loader. I recommend having this backup file. I won’t go into details on this process, but you can find more information in the below link.
- [[https://help.ubuntu.com/community/Grub2/Passwords]]
Fail2ban
A copy of the fail2ban jail configuration file occurs within the script:
cp /etc/fail2ban/jail.conf /etc/fail2ban/jail.local
If this isn’t done you may have issues with fail2ban actually starting. After it is complete and the service is enabled expect a basic setup with no other than a sshd jail. Note, that if you use ssh on a separate port you will need to configure the configuration files accordingly. I may cover that another time. Here is an example of an active fail2ban service:

Rkhunter and Unhide
In the script /etc/rkhunter.conf will have 3 lines changed.
On line #107:
UPDATE_MIRRORS=0is changed toUPDATE_MIRRORS=1On line #122:MIRRORS_MODE=0is changed toMIRRORS_MODE=1On line #1190:WEB_CMD=/bin/falseis changed toWEB_CMD=""
Following this change rkhunter will update if there are available updates using the following command:
sudo rkhunter --update
This command will be ran within the script followed by:
sudo rkhunter --propupd
This sets a baseline of your system. Ideally, this should be performed prior to the system being online, but this does not happen within the script. This will remove many of the initial false positives that are present due to binary changes over time.
unhide gives more functionality to rkhunter and should be treated as an extension of it.
Updatedb
updatedb will be initiated which will update the current database within your file-system. Later if you want to search something on your system you can run:
locate random_file
This will search your entire file-system and output anything that has the input string random_file.
Finally, within the cleanup function there will be the last package installs. I put these here since needrestart would periodically inform you that you need to restart your system. Also, debsecan was added for safe-keeping on the off-chance there was some user input required. If you are automating system maintenance I don’t see any harm in installing these towards the end to avoid the burdensome user input queries.
Let’s break down these two packages:
- needrestart
- A utility that helps keep a system up to date by checking for outdated software and providing notifications or suggestions for restarting services or system components to apply updates.
- debsecan
- A utility that helps keep a system secure by scanning for known vulnerabilities in installed packages and providing a summary of any issues found.
Banners
Banners are added to the following files:
/etc/motd/etc/issue/etc/issue.net
If you sign into your device via ssh take notice of the banner being displayed. It will look like this:
+----------------------------------------------------+
  | This is a controlled access system. The activities |
  | on this system are monitored.                      |
  | Evidence of unauthorised activities may be         |
  | disclosed to the appropriate authorities.          |
  +----------------------------------------------------+
Zsh or Fish
To end off 1.sh the user will be asked whether they want a zsh or fish shell. Once a selection is made all users whether it be root or any user with a /home directory will have their shells changed.
If zsh is selected:
- oh-my-zsh will be installed.
- The user will be prompted to change the active shell to
zsh.
If fish is selected”
- oh-my-fish will be installed.
- The user will have their current shell automatically changed to
fish. Forfishtake heed of the following output which will be displayed after installation:
  ~~ Installing oh-my-fish ~~

 ~~ Upon completion of oh-my-fish run ~~

 ~ omf install bobthefish

 ~~ If xclip is installed use SHIFT + CTRL + V ~~
Make sure you run:
omf install bobthefish
Alternatively, you can chose any of the other fish and oh-my-fish themes.
2.sh
This script will not be ran as root. The reasoning behind this is to ensure the user has access to the rust binaries located at ~/.cargo/bin without the need to prepend sudo to the rust binary.
Rust
If rust is not installed it will be installed.
If rustscan is not installed it will be installed.
If feroxbuster is not installed it will be installed.
- rustscan
- A command-line utility for scanning networks and identifying open ports and services. It is written in Rust and claims to be faster and more efficient than similar tools written in other languages.
- feroxbuster
- A command-line utility for enumerating subdomains of a given domain. It uses a combination of brute-force and wordlist-based techniques to discover subdomains and can also perform basic vulnerability scanning on discovered subdomains.
Rustscan is an extremely fast port scanner. When using HackTheBox or TryHackMe I always make sure I run this prior to the more in depth nmap scans that follow.
Feroxbuster is a go to subdomain discovery tool!
Zsh or Fish
To end off 1.sh the user will be asked whether they want a zsh or fish shell. Once a selection is made all users whether it be root or any user with a /home directory will have their shells changed.
If zsh is selected:
- oh-my-zsh will be installed.
- The user will be prompted to change the active shell to
zsh.
If fish is selected”
- oh-my-fish will be installed.
- The user will have their current shell automatically changed to
fish. Forfishtake heed of the following output which will be displayed after installation:
  ~~ Installing oh-my-fish ~~

 ~~ Upon completion of oh-my-fish run ~~

 ~ omf install bobthefish

 ~~ If xclip is installed use SHIFT + CTRL + V ~~
Make sure you run:
omf install bobthefish
Alternatively, you can chose any of the other fish and oh-my-fish themes.
3.sh
~/.local/bin
First off, the following directory will be created:
~/.local/binIf the following conditions are met:- The user is
rootand does not have a~/.local/bindirectory. - The user is in the
/etc/passwdfile, is located within the/homedirectory and doesn’t have a~/.local/bindirectory.
The purpose of this directory is to store local binaries. In our case this is where we will store the symbolic bat binary we will get to here in a moment.
For some strange reason the bat installation is installed as batcat. I find this mildly irritating not to be able to use it out-of-the-box as is, but nothing like a quick fix to solve the problem!
If the binary batcat exists on the file-system a symbolic link will be created to point the batcat binary to ~/.local/bin/bat like so:
ln -s /usr/bin/batcat ~/.local/bin/bat
The ~ representing the home directory of the current user. In the actual script is will be written as the absolute path:
ln -s /usr/bin/batcat /home/user/.local/bin/bat
ln -s /usr/bin/batcat /root/.local/bin/bat
If the following files/directories are present:
~/.bashrc~/.zshrc~/.config/fish
If the ~/.bashrc and/or ~/.zshrc files are present the following content will be appended to them:
export PATH="${HOME}/.local/bin:${PATH}"
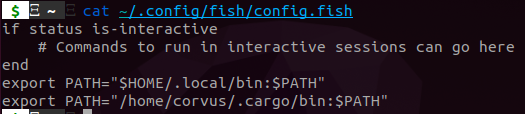
If the directory ~/.config/fish is present then the following will be appended to the ~/.config/fish/config.fish file:
set -x PATH $PATH $HOME/.local/bin
This will allow for the ~/.local/bin binaries to be accessible to the current shell whether it be bash/zsh/fish.
Alternatively, for fish you can manually set paths with the following command:
fish_add_path ~/.local/bin
Tldr
If tldr is present on the current system then a directory for root will be created at:
/root/.local/shareIn order to updatetldrthe above directory needs to be created. The~/.local/sharedirectory should already be created for any users. The following command will be ran for root and each user:tldr --update
After this update is complete feel free to type in tldr followed by any command/binary. This is one of my favorite tools! Check it out in action:
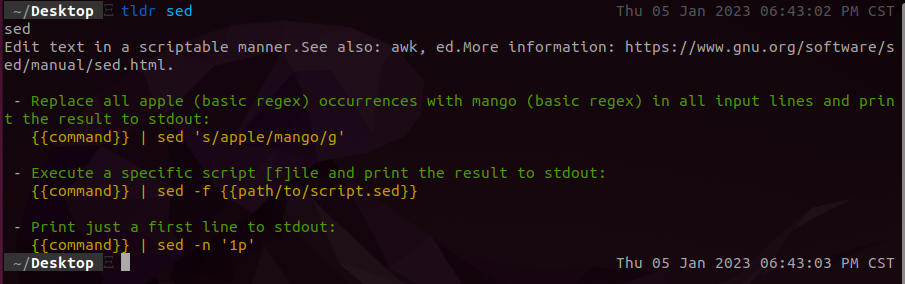
tldr is extremely useful for quick command references!
~/.cargo/bin
Since rust should be installed at this point if the following files/directories are present:
~/.bashrc~/.zshrc~/.config/fish
If the ~/.bashrc and/or ~/.zshrc files are present the following content will be appended to them:
export PATH="${HOME}/.cargo/bin:${PATH}"
If the directory ~/.config/fish is present then the following will be appended to the ~/.config/fish/config.fish file:
set -x PATH $PATH $HOME/.cargo/bin
This will allow for the ~/.cargo/bin binaries to be accessible to the current shell whether it be bash/zsh/fish.
Take note of the user binaries being available to root. This allows for the user to use the rust binaries without sudo, root to have access to the binaries and only a single install of rust. Here is what the root ~/.config/fish/config.fish file will look like:
Additionally, you can manually add them with fish_add_path like so:
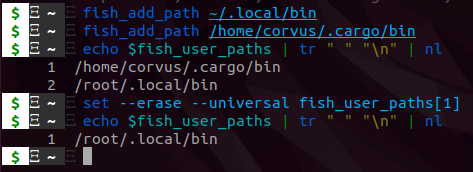
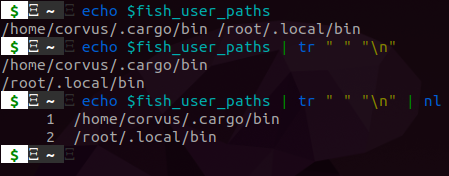
This is a super convenient way to add paths! Keep in mind that if your paths are located in ~/.config/fish/config.fish then the paths will be accessible in the shell, but they will not be visible when you run echo $fish_user_paths.
Test out tldr to determine what nl is accomplishing in the previous screenshot.
Here is a hint 😉:

- First line of
tldroutput
Terminator Configurations
Similar to the previous directory installation of ~/.local/bin if the ~/.config/terminator directory is not currently present on the file-system then it will be created based off of the same criteria:
- The user is
rootand does not have a~/.config/terminatordirectory. - The user is in the
/etc/passwdfile, is located within the/homedirectory and doesn’t have a~/.config/terminatordirectory.
Once there is a ~/.config/terminator directory the configuration file located within the /configs directory of the GitHub repository will be added.
The following file structures will be created based off of the /configs/terminatorconfigs file:
~/.config/terminator/config
I included the configurations I use for laptop settings at:
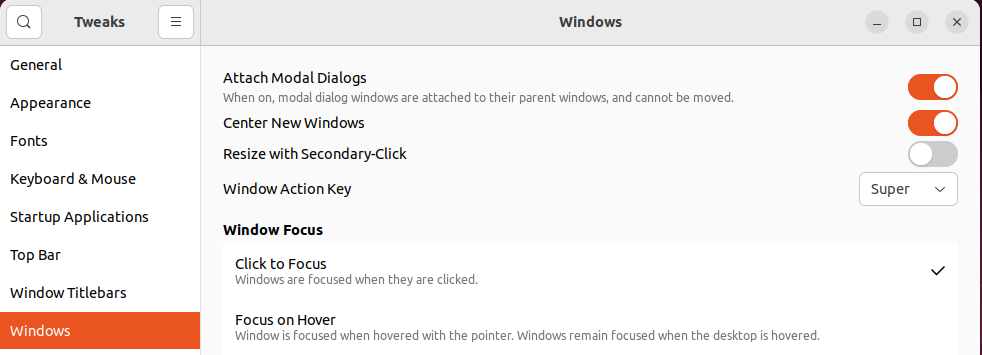
/configs/terminatorconfiglaptopThe only differences between the two are the size of the terminal and the location it will be placed at. Keep in mind that if you are using the newest version of Ubuntu the terminator screen will not populate in the middle of the screen. This is because the newest version of Ubuntu uses the Wayland display server protocol which replaces the X Window System. If you want your screen to be in the center in such a case then I recommend installing:gnome-tweaksGo to:- Tweaks -> Windows -> (Toggle) Center New Windows
It will look something like this:
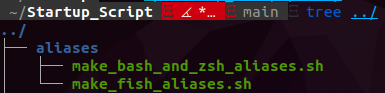
Aliases
To finish things off right all alias files will be dynamically updated. I incorporated two files with generic aliases that I commonly use. Once script 3.sh is ran then you will have access to these aliases. Bear in mind that in order to add the alias files automatically you need to have previously opted in to selecting the zsh shell, fish shell and/or both. Alternatively, you can find the alias files in the /aliases directory and manually run them this way to get their respective files which will dynamically update the alias files to include whatever the current active user’s name is. To find out you can run:
echo $USER
Checkout the GitHub repository for some example output of the aliases!
Now this long and arduous blog post is complete!
Happy hacking!
- Oxc0rvu5